My New Gun Case Kit :D
+24
PaintFreak
RickyMUA
jlirie
tashasbowtique
siouXzQ
anniel
barbb919
True Colors
rubyzcreationz
nikkili26
Katurah
boatload32359
rthling
Party Picassos
Valerie A
MissHolland
thouartbeautiful
PixiePaintrix
pattyofurniture
milliedoodles
gypsy6974
eviedejesus
SewDarnHot
FacepaintingByTanya
28 posters
Page 2 of 4
Page 2 of 4 •  1, 2, 3, 4
 Re: My New Gun Case Kit :D
Love, love, love. My husband is guarding his gun cases like a hawk.lol His doesn't have any that will really work. It's just been fun making him think they will. I'm going to keep my eye out for one that will. I am happy I haven't gotten around to buying a fatmax, that was my plan before I saw this.

boatload32359- Number of posts : 10
Age : 62
Location : Steinhatchee, Florida
Registration date : 2011-10-24
 Re: My New Gun Case Kit :D
FacepaintingByTanya wrote:The majority of them are purchased, but several I made as well. I've found I have staple mixes I tend to work with more than some of the more specialized/unique combos. I work from one-strokes and rainbows mainly, with black/white for detail work, so I don't need many solid color cakes. Now that I'm pretty comfy chopping up cakes, I'll likely be ordering big ones and creating splits from those to cut cost... I spent a lot of time slowly building up to what I have right now, and I'm pretty stocked up at this point, but I have a big event next month that will knock me out on my go-tos and I'll "have to" order more paints...
A few months back when I was just starting I thought it was a cheap hobby, what was i thinking
I love that idea of buying big cakes and splitting them up!
And I am in loooooveeee with your case!!!! Now I want one

MissHolland- Number of posts : 88
Location : Netherlands Assen
Registration date : 2013-12-09
 Re: My New Gun Case Kit :D
Looking FAB!!! and thank you for the step by step in detail! I've been debating on getting one of these but now I definitely think I will!!
 Re: My New Gun Case Kit :D
I love love love it...!

nikkili26- Number of posts : 1032
Age : 39
Location : Manchester, CT
Registration date : 2013-05-19
 Re: My New Gun Case Kit :D
Love it so much! It's confirming my decision to get one. I've had my fatmax for years before I re-purposed it for face painting. Checking out Amazon. Stores don't have much options:( Thank you so much for the inspiration!!!
 Re: My New Gun Case Kit :D
at some point, one of your crafty ladies needs to put together more cases as you build your own, so you can sell it to people like me who are toooooooooo busy with work, kids, school and our side business to even consider cutting, sewing, painting, and even shopping around for something like this...
I'd pay you for your time as well as supplies!!!!!!!!
I'd pay you for your time as well as supplies!!!!!!!!

nikkili26- Number of posts : 1032
Age : 39
Location : Manchester, CT
Registration date : 2013-05-19
 Re: My New Gun Case Kit :D
^ I've considered this, but I have 5 jobs and two kids myself, so would have to wait for a lull to get the time to customize another kit 
 Re: My New Gun Case Kit :D
Im am looking for a aluminum gun case to do this with. I am so excited. I love your step by step. It will help me do mine. Thank you
True Colors- Number of posts : 1
Registration date : 2014-02-10
 Re: My New Gun Case Kit :D
I see you made it and you will love the rest of this forum too. Have a wonderful time.True Colors wrote:Im am looking for a aluminum gun case to do this with. I am so excited. I love your step by step. It will help me do mine. Thank you

gypsy6974- Number of posts : 299
Location : New Orleans, La.
Registration date : 2013-10-26
 Update on the Case in Action
So I figured I'd do an update on how the case worked out at one of my busiest gigs of the year: a 4-day fair.
THE PROS:
- super fast setup... I mean like up and running in my booth within 5 minutes of arriving, compared to dealing with prepping multiple laptop cases and getting brushes out of the brush roll and digging for my water cup and prepping glitter setup. Open the lid, fill the water and Bob's your uncle
- super fast teardown... dump the water, close the lid and out the door in 5 minutes. Brilliant.
- total eye candy... I lost track of how many people oooh'd and ahh'd over how beautiful the setup looked in my booth. Even men were drawn to it (it's a gun case, and it's shiny, they thought it was very clever).
- complete protection... the paints being inset in the case kept prying fingers and linties out of my paints. When I needded to take 5, I just closed and locked it, hung a back in 5 sign and left (I had it locked down to a table with a cable lock... I'm not that trusting)
- glitter under control... having the inset glitter compartment on the right kept my sparkly friends the heck out of my paints, but still totally accessible. Right. On.
THE CONS:
- as tight as I tried to cut the layout into the foam that came with the case, it is still a fairly open-cell foam, which means it gives when the case gets moved... means paints flopped about in the case as I transported from home to booth. No bueno!! I grabbed the extra sheet of foam that was in the case and laid it over the paints, and that helped a lot, but still things shifted and I'd open up some paints tossed about. No likey
- This kind of foam does NOT clean up with a quick wet paper towel swipe... working that fast to paint that many people made a bit of a colorful disaster on the case inside. Can't clean to new = not going to work for me, I like a spotless prep kit.
- I have a lot of stuff. A LOT. Between brushes, paints, glitters, glues, light, water, yadayada, she's a heavy little suckah. Walking from parking into the Fair to my booth was a total PITA. I've got a shoulder that likes to remind me of its multiple dislocations when I carry heavy loads. And watching the handle strain under holding the weight makes me think it will eventually pop and there will be no handle. Lame!!
PLANNED TWEAKS:
- Weight issue: just going to bungee it to a little flatfold luggage cart. This worked great after day 1 of lugging, and will also reduce wear and tear on the case handle and latches.
- Foam issue: this ones more complicated...
I looked into doing a thin metal sheet with magnets on the paints - too heavy. Plus, the magnets are not strong enough and the cakes slide about on a test sheet. Nope.
So I looked into velcro on balsa sheet = too flimsy and stains (unless painted).
Looked into thin plexiglass: eliminates staining and flimsiness, but adds weight and means making cakes within existing velcroed containers all the time, or always adding velcro on new cakes. As much as I go through paint, that's a lotta velcro!
THE SOLUTION:
I ordered a kitchen sink (full demo and overhaul meant a new sink, yay!) - the box with the sink had thick but lightweight, core cell cardboard that happened to be a good size to cut down and fit the inside of the case. I took all my laptop case palette inserts, and chopped them down and puzzled them together, mounting them to the cardboard with glue. That's close-cell foam, totally cleanable and battle tested... the cardboard provides good support without much added weight. The inserts are precut to hold the paints tight in place, and they don't stretch or sag over time. This is a free, lightweight and durable solution that I am going to try out and see how it works.
Thanks for reading my update/book! Tanya
Tanya
THE PROS:
- super fast setup... I mean like up and running in my booth within 5 minutes of arriving, compared to dealing with prepping multiple laptop cases and getting brushes out of the brush roll and digging for my water cup and prepping glitter setup. Open the lid, fill the water and Bob's your uncle
- super fast teardown... dump the water, close the lid and out the door in 5 minutes. Brilliant.
- total eye candy... I lost track of how many people oooh'd and ahh'd over how beautiful the setup looked in my booth. Even men were drawn to it (it's a gun case, and it's shiny, they thought it was very clever).
- complete protection... the paints being inset in the case kept prying fingers and linties out of my paints. When I needded to take 5, I just closed and locked it, hung a back in 5 sign and left (I had it locked down to a table with a cable lock... I'm not that trusting)
- glitter under control... having the inset glitter compartment on the right kept my sparkly friends the heck out of my paints, but still totally accessible. Right. On.
THE CONS:
- as tight as I tried to cut the layout into the foam that came with the case, it is still a fairly open-cell foam, which means it gives when the case gets moved... means paints flopped about in the case as I transported from home to booth. No bueno!! I grabbed the extra sheet of foam that was in the case and laid it over the paints, and that helped a lot, but still things shifted and I'd open up some paints tossed about. No likey
- This kind of foam does NOT clean up with a quick wet paper towel swipe... working that fast to paint that many people made a bit of a colorful disaster on the case inside. Can't clean to new = not going to work for me, I like a spotless prep kit.
- I have a lot of stuff. A LOT. Between brushes, paints, glitters, glues, light, water, yadayada, she's a heavy little suckah. Walking from parking into the Fair to my booth was a total PITA. I've got a shoulder that likes to remind me of its multiple dislocations when I carry heavy loads. And watching the handle strain under holding the weight makes me think it will eventually pop and there will be no handle. Lame!!
PLANNED TWEAKS:
- Weight issue: just going to bungee it to a little flatfold luggage cart. This worked great after day 1 of lugging, and will also reduce wear and tear on the case handle and latches.
- Foam issue: this ones more complicated...
I looked into doing a thin metal sheet with magnets on the paints - too heavy. Plus, the magnets are not strong enough and the cakes slide about on a test sheet. Nope.
So I looked into velcro on balsa sheet = too flimsy and stains (unless painted).
Looked into thin plexiglass: eliminates staining and flimsiness, but adds weight and means making cakes within existing velcroed containers all the time, or always adding velcro on new cakes. As much as I go through paint, that's a lotta velcro!
THE SOLUTION:
I ordered a kitchen sink (full demo and overhaul meant a new sink, yay!) - the box with the sink had thick but lightweight, core cell cardboard that happened to be a good size to cut down and fit the inside of the case. I took all my laptop case palette inserts, and chopped them down and puzzled them together, mounting them to the cardboard with glue. That's close-cell foam, totally cleanable and battle tested... the cardboard provides good support without much added weight. The inserts are precut to hold the paints tight in place, and they don't stretch or sag over time. This is a free, lightweight and durable solution that I am going to try out and see how it works.
Thanks for reading my update/book!
 Re: My New Gun Case Kit :D
Do you have pics of the new foam? I'm getting my case soon. I had a feeling the open cell foam would be a problem, but was waiting for an update. Didn't wanna burst your creative bubble, and I've been super impressed with what you've done, so far.
Meanwhile, I didn't think of it giving and letting your stuff slosh about. No bueno, indeed. I was concerned that it would get stained and look messy. I like a clean setup, as well.
Thank you so much for the update. I am looking forward to creating my own setup when I get my case.
Meanwhile, I didn't think of it giving and letting your stuff slosh about. No bueno, indeed. I was concerned that it would get stained and look messy. I like a clean setup, as well.
Thank you so much for the update. I am looking forward to creating my own setup when I get my case.
 Re: My New Gun Case Kit :D
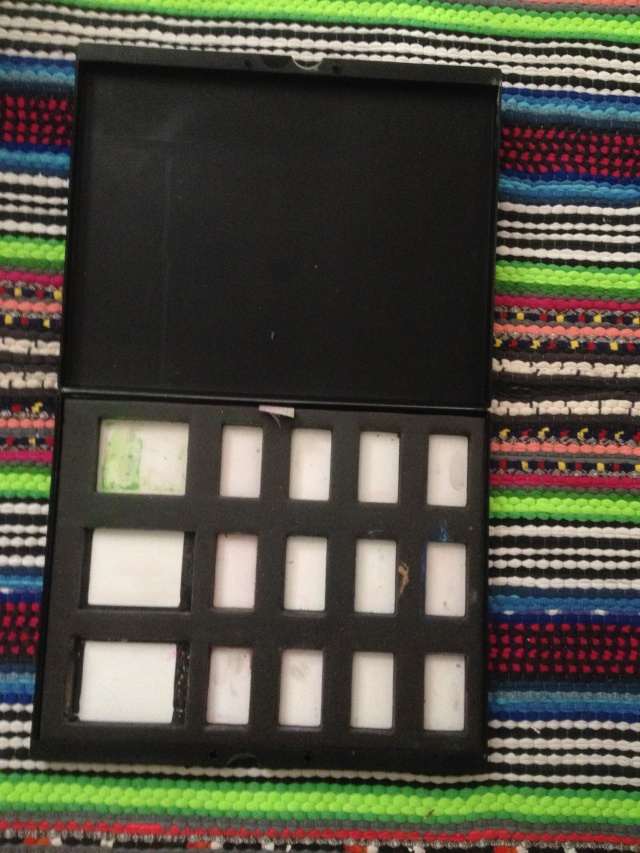
If you source the foam palette inserts for the laptop cases, that's what I cut apart and puzzled together on the core cardboard sheet. They look like this (when not cut up and Frankenkitted)... 

 Re: My New Gun Case Kit :D
Frankenknitted. Haha!
I know what those look like, I just wondered if you have photos of the Frankenknitted kit, now that you've swapped to these.
Thanks, lol. I have these, and may use them, too.
I know what those look like, I just wondered if you have photos of the Frankenknitted kit, now that you've swapped to these.
Thanks, lol. I have these, and may use them, too.
 Re: My New Gun Case Kit :D
I just finished the puzzling and gluing - once it's all dry I'll reassemble and put back into the kit and take some pix to post 
 Re: My New Gun Case Kit :D
Since I read the first post I fell in love with the kit you made. So recently in my quest to find a gun case, my hubby mentioned Bass Pro Shops. It was a great idea!! I was able to hand touch it and it was affordable:D:D:D
http://www.basspro.com/RedHead-Aluminum-Rifle-Gun-Cases/product/95084/
Now I'm waiting for the final 3 shipments of airbrush and paints to pimp out the case:). Thank you for the up dates, too. It will help when I start to tear through it....haha.
http://www.basspro.com/RedHead-Aluminum-Rifle-Gun-Cases/product/95084/
Now I'm waiting for the final 3 shipments of airbrush and paints to pimp out the case:). Thank you for the up dates, too. It will help when I start to tear through it....haha.
 Re: My New Gun Case Kit :D
My kit and foam in the exact gun case is cleaning well and holding my paints in place. But I did glue and duck tape cardboard under foam to start with. So the holes I cut out has cardboard underneath it. The circle of foam that I cut out, I then cut the circle in half and glued that to the cardboard for pots under 45 grams. The only pots that I did not have to do that for is the 45 and 90 grams pots. Well it's not exactly cardboard that I glued, it the long place mats with the shinny side that you find in the Dollar Store in the little school section and I doubled it. So shinny goal side is under paints and under bottom of foam for extra support and no water can get to backing of mats. With these mats glued onto the bottom of my foam I can lift the foam up and out of my case with it bending or my paints falling out. It just lifts out and onto a table or wherever I want it to be. It is getting a little heavy since I keep adding stuff to my second layer and buying more FP's. I even have my emergency kit in there for the you never know what can happen. So, I ordered a dolly from Amazon
http://www.amazon.com/Safco-Steel-Luggage-Cart-capacity/dp/B006TINLQM/ref=sr_1_6?ie=UTF8&qid=1393017331&sr=8-6&keywords=dollys+for+luggage
This way the dolly will hold my gun case a small table and a chair or two for sitting. It looks nice (the dolly that is) and it holds 250 lbs. Working tomorrow and my case looks good and professional as can be, and so clean. If I run into any saffoo's I will let you know. But so good so far. I can't wait for that beautiful dolly though.
Last edited by gypsy6974 on Fri Feb 21, 2014 7:02 pm; edited 1 time in total

gypsy6974- Number of posts : 299
Location : New Orleans, La.
Registration date : 2013-10-26
 Re: My New Gun Case Kit :D
Here are 2 tips that I found useful in making and cleaning my case. 1) I did not glue all the little circles or squares because 1/2 way through I thought maybe they might need to come out and be washed eventually so I stopped. But they still stay in place. I also did not use the container that I was going to put in the hole to use for an outline to cut. I did two that way and put pots in and found it might be too lose. Then I just used a Paradise pot to do the rest of my outlines for they are a little smaller. Now all the bigger cakes fits snug, as in Tag, Wolfe, and others. For my Paradise cakes I found a glass smaller then the Paradise container.
Tip 2) I read Tanya's post this morning and thought why is her's not coming clean and my foam is cleaning up well. I went to my case and painted some Wolfe green on a section. I made it wet with the paint then I let it dry most of the day. I just washed it a little while ago and here are some pics of how it came out. In one pic. it looks still stripped with white, but it was not dry yet after I used the dryer sheet, and two I found that I needed to remove more of the white that the dryer sheet left behind. So a little more soap & water on a rag and it's black again. I use a wet dryer sheet to remove the paint from my foam. First I wash it with soap and water then hit it with a slightly moist dryer sheet. Paints come right out. I use dryer sheets to clean love-bugs off the front of my car and to clean the scum from my shower doors. Damp dryer sheets will clean almost anything and my shower doors are beautiful with no water or soap spots. Here are the pics. Remember I let this paint stay on all day to dry well. No stains. I also found out today that dryer sheets cleans practice heads pretty well too. I love dryer sheets and they smell so good even when in your trash can. My kit smells of fresh Bounty dryer sheets.


Tip 2) I read Tanya's post this morning and thought why is her's not coming clean and my foam is cleaning up well. I went to my case and painted some Wolfe green on a section. I made it wet with the paint then I let it dry most of the day. I just washed it a little while ago and here are some pics of how it came out. In one pic. it looks still stripped with white, but it was not dry yet after I used the dryer sheet, and two I found that I needed to remove more of the white that the dryer sheet left behind. So a little more soap & water on a rag and it's black again. I use a wet dryer sheet to remove the paint from my foam. First I wash it with soap and water then hit it with a slightly moist dryer sheet. Paints come right out. I use dryer sheets to clean love-bugs off the front of my car and to clean the scum from my shower doors. Damp dryer sheets will clean almost anything and my shower doors are beautiful with no water or soap spots. Here are the pics. Remember I let this paint stay on all day to dry well. No stains. I also found out today that dryer sheets cleans practice heads pretty well too. I love dryer sheets and they smell so good even when in your trash can. My kit smells of fresh Bounty dryer sheets.


gypsy6974- Number of posts : 299
Location : New Orleans, La.
Registration date : 2013-10-26
 Re: My New Gun Case Kit :D
OK, so I completed the tweaks and am much happier with how it's laid out. I realized while I was working on it that the case comes with two densities of foam sheet, and I think I used the more open cell one to inset my cakes into, but the changes I made are a lot better for long term. I've got some pics to show what I changed..... sorry for so much info, but I figured if anyone's going the case route, they'll want lots of detailed info and help (I know I was on the hunt for info for a while before tackling this project!)... here goes...
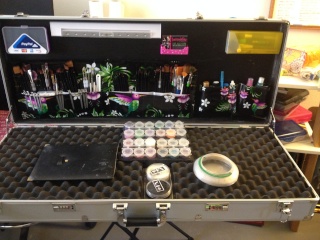
Here's an overview showing how it looks now, compared to the finished overview from the first setup.
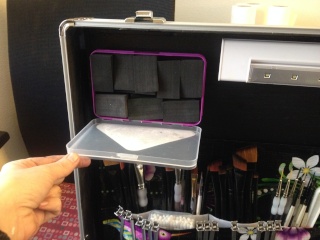
I added this little storage box in the top left of the lid, to hold my sponge stash (I use black wedges, love 'em)...
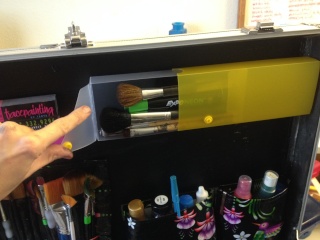
I added a pencil case to the upper right inside lid, to keep all my glitter brushes and sandwich board markers separate from my paint supplies.
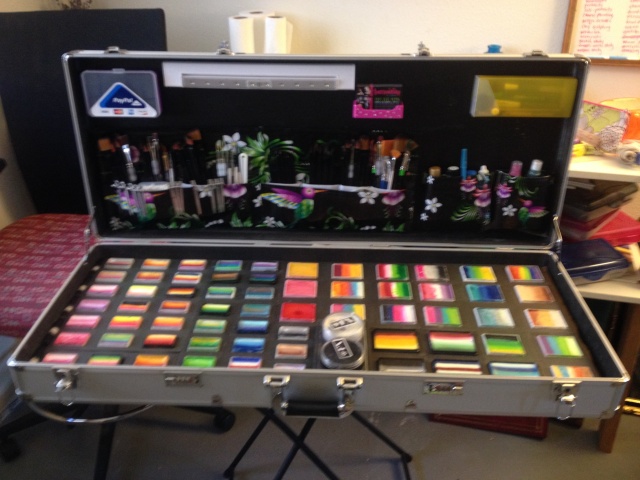
Here's an overview of the inside with the protective foam layers removed... I moved some things around in the lid (business card holder) added a second pouch for bottles of stuff, like hand sanitizer lotion, adhesives, brush cleaner, etc).
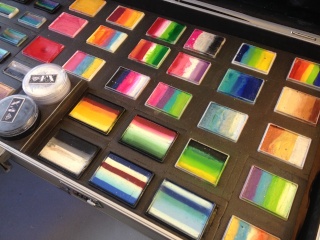
Here's a closeup of the right side of the main paint area - you can see I Frankencut my laptop case inserts and puzzled them together to fill the lower case. I glued these to a sturdy dual-core layer of cardboard about 1.5" thick, cut to fit the case... sourced this from a box I got with a sink from Home Depot... yay, recycling!!
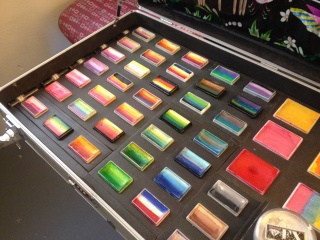
Here's a shot of the left side, 1-stroke-palooza! Also had a little extra space on the side, which I used to store my little sushi roll tubes
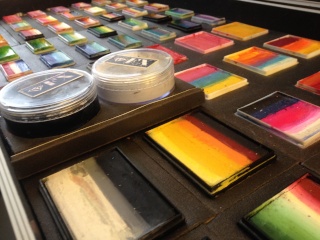
Black/white I get pretty messy with, so I created a raised insert adding extra foam layers from the laptop case I puzzled and making a higher layer. On the go, I'll keep the lids on, at home lids are off so they breathe. Having them raised prevents them splattering into my cakes below, which I tend to do when I really get going.
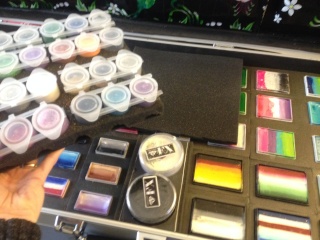
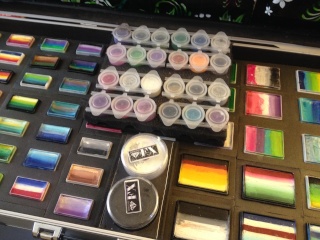
I half-cut a piece of extra foam to use as a protective layer over the paints, under the glitter tray... I had used some shelf-liner to protect the paints in the first kit version, but found it stuck to my paints and made a big mess when I packed up at the end of the day. Yuck. The foam doesn't stick at all.
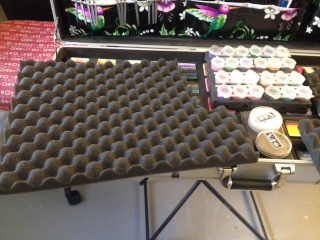
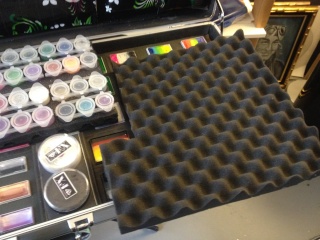
I cut out the left/right layers to work around the glitter tray in the top center of the kit. They fit nice and snug, which protects the paints and keeps anything from shifting around making a mess.
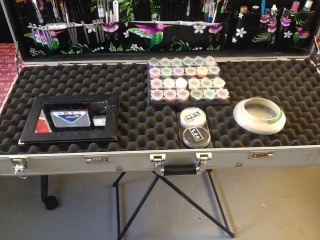
Once the foam layers are on, my collapsible water container and mirror sit right on top... they don't touch the brushes in the lid when the lid is closed, so no tweaked brushes
That's it! think this addresses all the cons I had in the first trial setup. Have more gigs coming up to test this all out at, but I'm thinking I'm good to go for now. If anyone's putting together a case and has any questions, feel free to message me

Here's an overview showing how it looks now, compared to the finished overview from the first setup.

I added this little storage box in the top left of the lid, to hold my sponge stash (I use black wedges, love 'em)...

I added a pencil case to the upper right inside lid, to keep all my glitter brushes and sandwich board markers separate from my paint supplies.

Here's an overview of the inside with the protective foam layers removed... I moved some things around in the lid (business card holder) added a second pouch for bottles of stuff, like hand sanitizer lotion, adhesives, brush cleaner, etc).

Here's a closeup of the right side of the main paint area - you can see I Frankencut my laptop case inserts and puzzled them together to fill the lower case. I glued these to a sturdy dual-core layer of cardboard about 1.5" thick, cut to fit the case... sourced this from a box I got with a sink from Home Depot... yay, recycling!!

Here's a shot of the left side, 1-stroke-palooza! Also had a little extra space on the side, which I used to store my little sushi roll tubes

Black/white I get pretty messy with, so I created a raised insert adding extra foam layers from the laptop case I puzzled and making a higher layer. On the go, I'll keep the lids on, at home lids are off so they breathe. Having them raised prevents them splattering into my cakes below, which I tend to do when I really get going.


I half-cut a piece of extra foam to use as a protective layer over the paints, under the glitter tray... I had used some shelf-liner to protect the paints in the first kit version, but found it stuck to my paints and made a big mess when I packed up at the end of the day. Yuck. The foam doesn't stick at all.


I cut out the left/right layers to work around the glitter tray in the top center of the kit. They fit nice and snug, which protects the paints and keeps anything from shifting around making a mess.

Once the foam layers are on, my collapsible water container and mirror sit right on top... they don't touch the brushes in the lid when the lid is closed, so no tweaked brushes
That's it! think this addresses all the cons I had in the first trial setup. Have more gigs coming up to test this all out at, but I'm thinking I'm good to go for now. If anyone's putting together a case and has any questions, feel free to message me
 Re: My New Gun Case Kit :D
I am in love with your guncase and all your paints! love, love, love it!

MissHolland- Number of posts : 88
Location : Netherlands Assen
Registration date : 2013-12-09
 Re: My New Gun Case Kit :D
Quick heads up on the aluminum--keep your receipt, with age and abuse, the aluminum (which is just a thin sheet) will buckle/separate--so you can upgrade cheaply to a sturdier choice at that point. (same innards, just new case...)
 Re: My New Gun Case Kit :D
So far so good... I wheel mine on a mini luggage cart so it doesn't get too much handling abuse. It was an eBay find so no returns, but thinking if I treat it nicely it should last a long time. The aluminum is not as sturdy as other materials, but the lightweight kit with lots of storage makes up for the durability issue (for now, when it breaks I'll be singing a different tune) 
 Re: My New Gun Case Kit :D
Did some re-organizing (replaced a bunch of cakes with custom ones I made from my Global slice-a-palooza)... here's how the case looks presently...
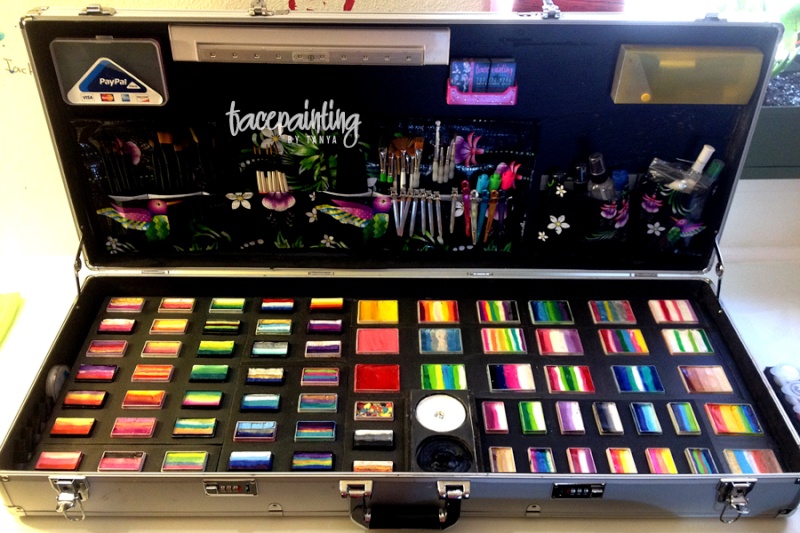
Loaded up (I use 4 of these collapsible water cups now - 1 for white, 1 for black, 1 for warms, 1 for cools... and have two large flat mirrors (one for reveals, 1 I hang in my booth)
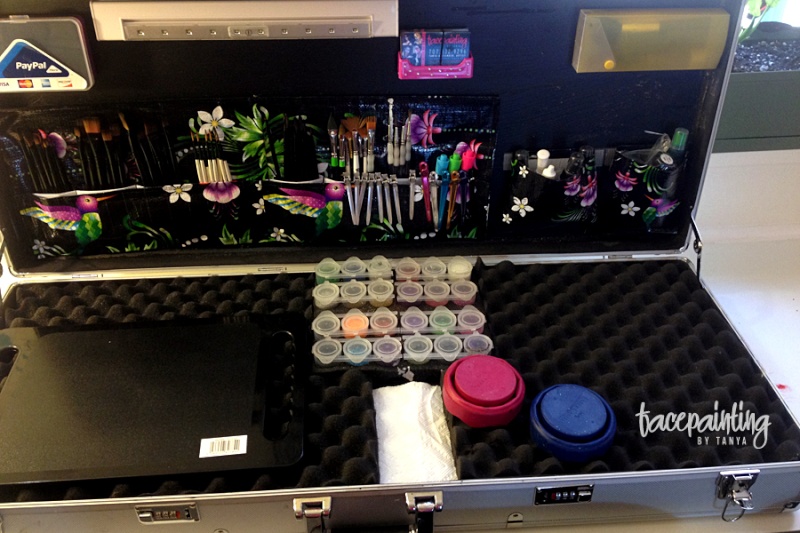
Just figured I'd post the latest config in case anyone is still building and needs improvement ideas

Loaded up (I use 4 of these collapsible water cups now - 1 for white, 1 for black, 1 for warms, 1 for cools... and have two large flat mirrors (one for reveals, 1 I hang in my booth)

Just figured I'd post the latest config in case anyone is still building and needs improvement ideas
Page 2 of 4 •  1, 2, 3, 4
 Similar topics
» Anyone use this case? laptop case for 24 cakes
» Just in Case
» New gun case
» My New Gun Case Kit :E
» Director's Chair with CARRYING CASE?
» Just in Case
» New gun case
» My New Gun Case Kit :E
» Director's Chair with CARRYING CASE?
Page 2 of 4
Permissions in this forum:
You cannot reply to topics in this forum
