My New Gun Case Kit :E
2 posters
Page 1 of 1
 My New Gun Case Kit :E
I have researched kits and setups for a long time. I wanted something that I knew would take the awful drag out of lugging all that STUFF with me. I was tired of my collapsible wagon, scrapbook tote, over the shoulder bags and more trips to the car. I have seen many setups and cases but I wasn't feeling it. Then Tanya showed up on the scene, she was going through all the same things that I was. She had a wonderful plan and the results were awesome. I was inspired and this is what I came up with. Not as beautiful and creative as Tanya's, but I am happy with it. I would say it weights maybe 20 or so pounds.
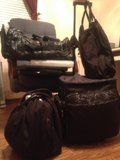
First let me show & tell what I get to leave at home.

This is just some of the things that stay home now. The other things that I have done away with are; 2, 4 ft. tables, 2, art bins, 1 large brush stand, a collapsible wagon, 3 table clothes, 2 laptops cases and one large plastic container with more FP's. I cut back by re-potting a little paint in one (medium but on the small side for me) plastic container along with all my one-strokes.


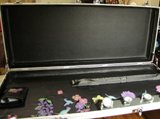
This is the bottom layer of foam with some more FP and my Starblends.
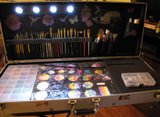
Now top layer of foam.


I did not go with the brush case that took me a full day to make and re do and re do again, because I was worried that my brush bristles would touch the foam and the bristles would go astray. So, I tried something different after spending the day looking at other ways to attach the brushes. I wasn't sure about this because I don't want to be cleaning my case lid a thousand times a gig. Then, I would rather do that than take a chance of ruining my brushes. I knew the art bins had to stay home. I was tried of taking all the brushes out then lining them up in the brush stand. Too much time wasted! It seemed like I was doing a lot of wasting time by hauling too much stuff and setting it up, breaking it down and many trips to the car, FED UP and tired of that!
I still have a few tweaks to make. I need to put a hook on the opposite side of my case to tie the ribbon tight that will hold my brushes extra secure. I don't think it will need the ribbon but just in case. I also need to attach the glitter to something? I might glue some round Velcro holders in place. I will be finding new cases that will fit in the open end better than I have now. I also need to cut a piece of foam for the gems in the right hand corner of foam. I thought about cutting spaces for my liquid bling but I want to be able to hang them upside down when I work. I am happy and so grateful for Tanya's awesome ideas. What an inspiration. Thank you Tanya!!!
First let me show & tell what I get to leave at home.

This is just some of the things that stay home now. The other things that I have done away with are; 2, 4 ft. tables, 2, art bins, 1 large brush stand, a collapsible wagon, 3 table clothes, 2 laptops cases and one large plastic container with more FP's. I cut back by re-potting a little paint in one (medium but on the small side for me) plastic container along with all my one-strokes.


This is the bottom layer of foam with some more FP and my Starblends.
Now top layer of foam.


I did not go with the brush case that took me a full day to make and re do and re do again, because I was worried that my brush bristles would touch the foam and the bristles would go astray. So, I tried something different after spending the day looking at other ways to attach the brushes. I wasn't sure about this because I don't want to be cleaning my case lid a thousand times a gig. Then, I would rather do that than take a chance of ruining my brushes. I knew the art bins had to stay home. I was tried of taking all the brushes out then lining them up in the brush stand. Too much time wasted! It seemed like I was doing a lot of wasting time by hauling too much stuff and setting it up, breaking it down and many trips to the car, FED UP and tired of that!
I still have a few tweaks to make. I need to put a hook on the opposite side of my case to tie the ribbon tight that will hold my brushes extra secure. I don't think it will need the ribbon but just in case. I also need to attach the glitter to something? I might glue some round Velcro holders in place. I will be finding new cases that will fit in the open end better than I have now. I also need to cut a piece of foam for the gems in the right hand corner of foam. I thought about cutting spaces for my liquid bling but I want to be able to hang them upside down when I work. I am happy and so grateful for Tanya's awesome ideas. What an inspiration. Thank you Tanya!!!

gypsy6974- Number of posts : 299
Location : New Orleans, La.
Registration date : 2013-10-26
 Re: My New Gun Case Kit :E
 Re: My New Gun Case Kit :E
Yes she wanted me off of that chair and down on the floor at her level. I am so grateful for your wonderful photos and all the details that you listed. It was a hard job but I am so happy that it is finished. Now I just have to glue the Velcro strips. It's not too heavy and it can handle some more paint. I had to take a few days off because I was obsessed on this project and needed to clear my head. Once again thank you.

gypsy6974- Number of posts : 299
Location : New Orleans, La.
Registration date : 2013-10-26
 Similar topics
» Anyone use this case? laptop case for 24 cakes
» Just in Case
» New gun case
» My New Gun Case Kit :D
» Most amazing case!!!
» Just in Case
» New gun case
» My New Gun Case Kit :D
» Most amazing case!!!
Page 1 of 1
Permissions in this forum:
You cannot reply to topics in this forum
