

Your setup
Page 5 of 5 •  1, 2, 3, 4, 5

barbb919- Number of posts : 2109
Location : Lacrosse Wisconsin
Registration date : 2010-03-23 -

Re: Your setup
![]() by Miss Ronnie Wed Jun 06, 2012 9:31 pm
by Miss Ronnie Wed Jun 06, 2012 9:31 pm

Miss Ronnie- Number of posts : 3089
Age : 63
Location : Carthage, New York
Registration date : 2011-08-28 -
Re: Your setup
![]() by Miss Ronnie Wed Jun 06, 2012 10:45 pm
by Miss Ronnie Wed Jun 06, 2012 10:45 pm
Miss Ronnie- Number of posts : 3089
Age : 63
Location : Carthage, New York
Registration date : 2011-08-28 -
Re: Your setup
![]() by 1HappyNut Wed Jun 06, 2012 11:13 pm
by 1HappyNut Wed Jun 06, 2012 11:13 pm

1HappyNut- Number of posts : 632
Age : 47
Location : British Columbia
Registration date : 2011-06-02
Re: Your setup
![]() by Miss Ronnie Thu Jun 07, 2012 9:32 am
by Miss Ronnie Thu Jun 07, 2012 9:32 am
Miss Ronnie- Number of posts : 3089
Age : 63
Location : Carthage, New York
Registration date : 2011-08-28 -
Re: Your setup
![]() by barbb919 Thu Jun 07, 2012 10:18 am
by barbb919 Thu Jun 07, 2012 10:18 am
barbb919- Number of posts : 2109
Location : Lacrosse Wisconsin
Registration date : 2010-03-23 -
Re: Your setup
![]() by Miss Ronnie Thu Jun 07, 2012 11:01 am
by Miss Ronnie Thu Jun 07, 2012 11:01 am
I have a grommet maker... but we will give the folded over the clothesline thing a try for this weekend's event, since we have to set up later today...
Miss Ronnie- Number of posts : 3089
Age : 63
Location : Carthage, New York
Registration date : 2011-08-28 -
Denise's Setup
![]() by Denise Cold Mon Apr 08, 2013 4:29 pm
by Denise Cold Mon Apr 08, 2013 4:29 pm
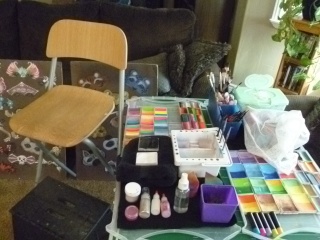
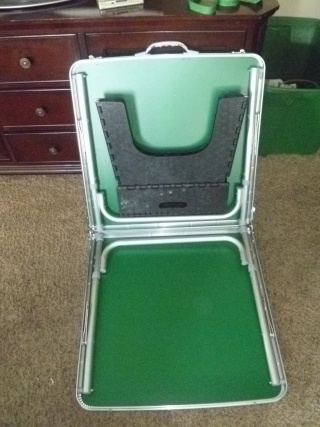
I've had the tailgate table almost 9 months now and I like it. It's light enough to pack into the car "just in case" and I figured out I could put my step stool inside of it which makes carrying everything easier. I found out that if I remove the foot rest on my IKEA tall bar chair that the stool fits right between. It's really easy for kids to get in and out of now and I can scoot it under the chair if I want it out of the way.
I leave all of my paints open all of the time and I also leave my Starblends open and just drape a cloth like I do my paints. I've been lucky to not have any break yet except my Brownple and it was the only one so I just repressed it (it was homemade.)
What I like about the slim scrapbook cases (I've talked about them before) is I don't velcro anything. I just open the lid, take out the fleece insert, put it in the lid and my paints are ready to go. I clean off my paints often and the case so the no velcro makes that easy.
I've really loved my scrubbies in my basin. They are getting really ugly looking. I might have to break down and make a new basin but I can't imagine trying to get my brushes clean between clients without them.
With Starblends. They have their own case:
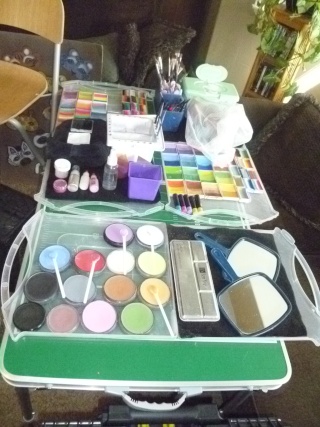
Table folded with stool inside:
I keep my white and black paint on my towel. I find the towel necessary for water control for one-stroke. You can fold it and refold it on long gigs.
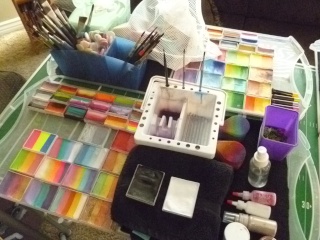
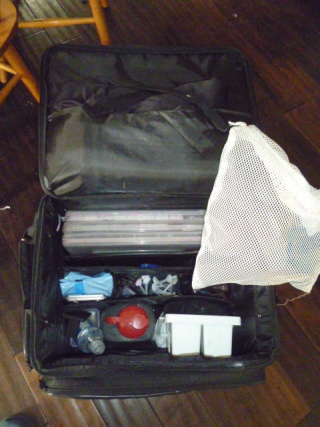
Here's my scrapbook case loaded. It fits most of my Fatmax contents, there's a few things that I've had to leave behind like my special effects stuff and Mehron metallic powders that fit easily in the Fatmax but there is enough wiggle room if I have to, I could put them in a bag and put them on top.
I have a black table cloth strapped to the lid with velcro straps that were part of the case. I put my sponges on top after all is packed and just leave them in the lingerie bag on the table. There are a couple of spray bottles, hair clips and things you can't see and then all my glitters and knicknacks are in the outside little pockets.
Last edited by Denise Cold on Mon Apr 08, 2013 4:34 pm; edited 1 time in total (Reason for editing : title)

Denise Cold- Number of posts : 2717
Age : 59
Location : Orem, UT
Registration date : 2011-04-06 -
Re: Your setup
![]() by erica21 Mon Apr 08, 2013 8:15 pm
by erica21 Mon Apr 08, 2013 8:15 pm

erica21- Number of posts : 160
Age : 50
Location : Australia
Registration date : 2011-11-26
Re: Your setup
![]() by Denise Cold Tue Apr 09, 2013 2:05 am
by Denise Cold Tue Apr 09, 2013 2:05 am
Denise Cold- Number of posts : 2717
Age : 59
Location : Orem, UT
Registration date : 2011-04-06 -
Re: Your setup
![]() by Jody Rife Tue Apr 09, 2013 10:03 am
by Jody Rife Tue Apr 09, 2013 10:03 am
http://www.ebay.com/itm/ExpreSS-Art-Bin-Tote-Art-Bin-Tote-ExpreSS-17-5-X13-X30-5-Black-Grey-Red-/400414933134?pt=US_CSA_MWA_Backpacks&hash=item5d3a97008e

Jody Rife- Number of posts : 1725
Age : 51
Location : Gallipolis,Ohio
Registration date : 2011-02-19 -
Re: Your setup
![]() by Denise Cold Tue Apr 09, 2013 10:41 am
by Denise Cold Tue Apr 09, 2013 10:41 am
D.
Denise Cold- Number of posts : 2717
Age : 59
Location : Orem, UT
Registration date : 2011-04-06 -
Re: Your setup
![]() by Psalmbook Tue Apr 09, 2013 12:36 pm
by Psalmbook Tue Apr 09, 2013 12:36 pm
But there aren't many situations where I have to climb stairs & in FL there are no basements (they'd flood). I drive a mini van so there's room for it.
I have just ordered my jewelry trays & insert & will be transferring my paints into them.... This is my 1st BIG change to my kit since I got my Fatmax.... but I think I'll like it.

Psalmbook- Number of posts : 7642
Location : JAX, FL
Registration date : 2010-03-09 -
Re: Your setup
![]() by erica21 Tue Apr 09, 2013 9:08 pm
by erica21 Tue Apr 09, 2013 9:08 pm
Denise Cold wrote:They are half TAG pearl black and Wolfe black and TAG pearl white and Wolfe white. I like having the pearl white next to white so I get the best of both worlds and I mix them on the sponge. I have the pearl black for when I'm doing a lot of black or outlining on a younger child.
Oh thanks for letting me know! :-)
erica21- Number of posts : 160
Age : 50
Location : Australia
Registration date : 2011-11-26
Re: Your setup
![]() by PaolaSunglow Tue Apr 30, 2013 11:06 am
by PaolaSunglow Tue Apr 30, 2013 11:06 am
http://www.facepaintforum.com/t14330-first-festival#204955

PaolaSunglow- Number of posts : 1400
Age : 58
Location : South New Jersey/Shore
Registration date : 2012-11-16 -
Re: Your setup
![]() by rthling Tue Apr 30, 2013 1:28 pm
by rthling Tue Apr 30, 2013 1:28 pm
Here are all three pieces of 3/4" electrical conduit. There is duct tape on the ends that come in contact with my tent canvas, to prevent wearing the canvas. The long piece is a 10' section which has been bent at the ends to create the top of the frame.
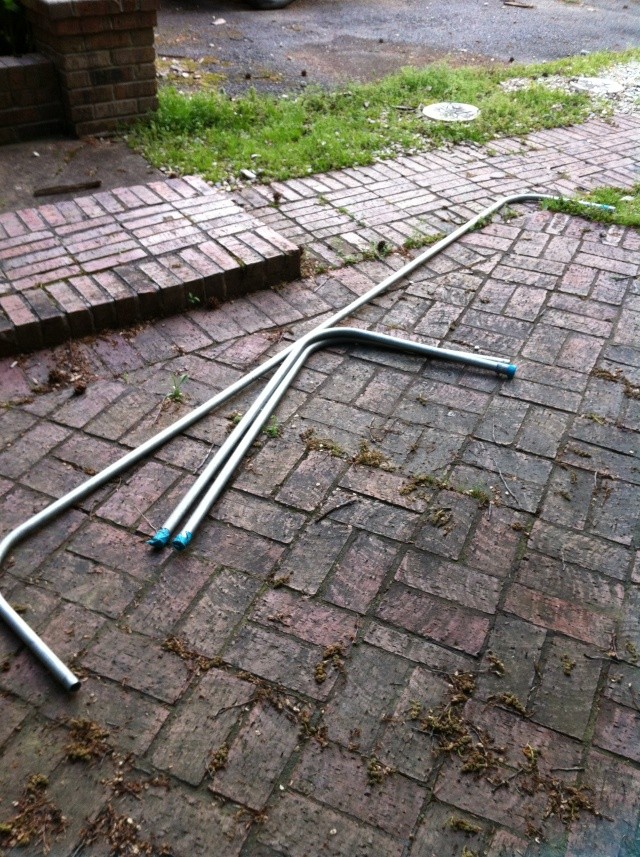
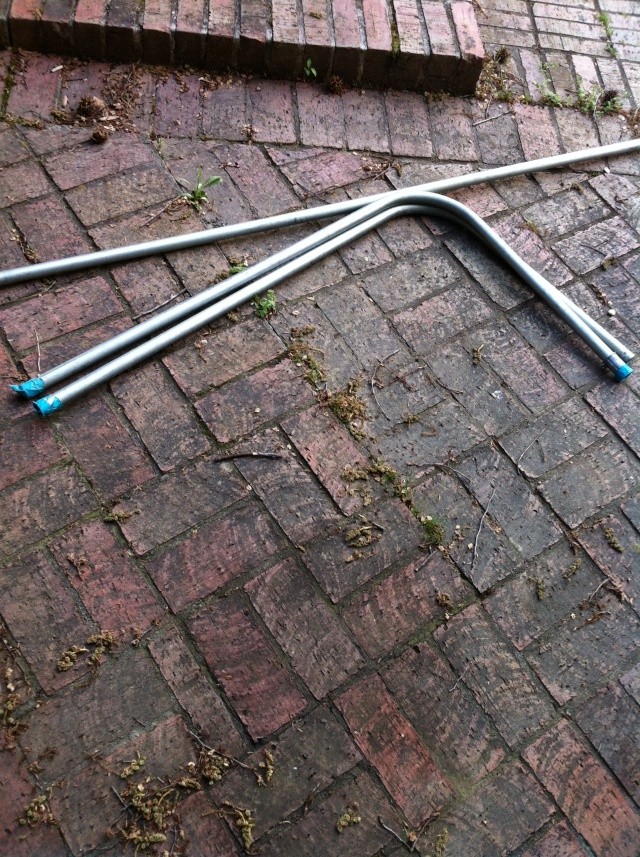
The elbow pieces up closer.
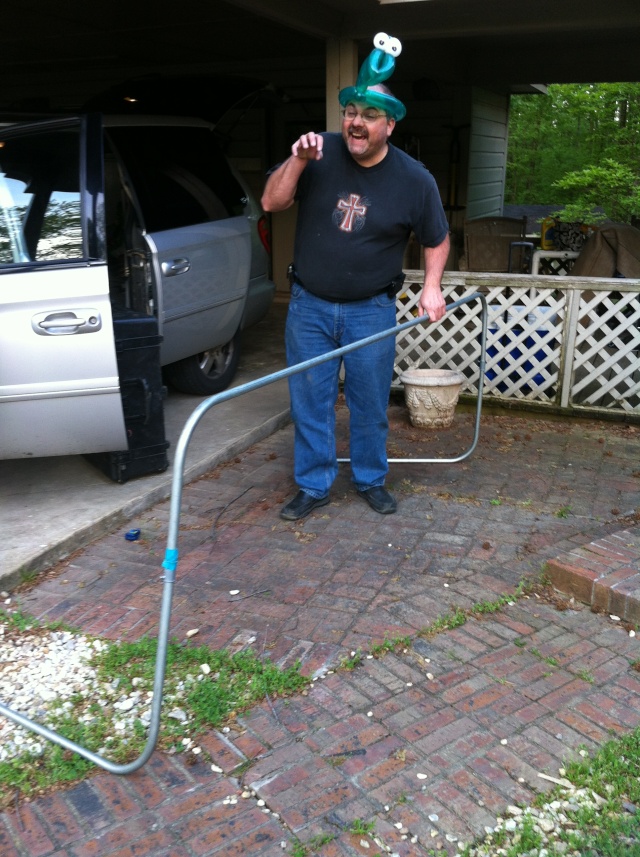
Hubby being silly. This is the pieces put together. The long parts of the elbow pieces get zip-tied (cable ties) to the tent frame. I zip tie my banner to the frame. It has held up in wind advisory conditions.
This is a close up of the coupling that holds the top long piece to the elbow pieces.
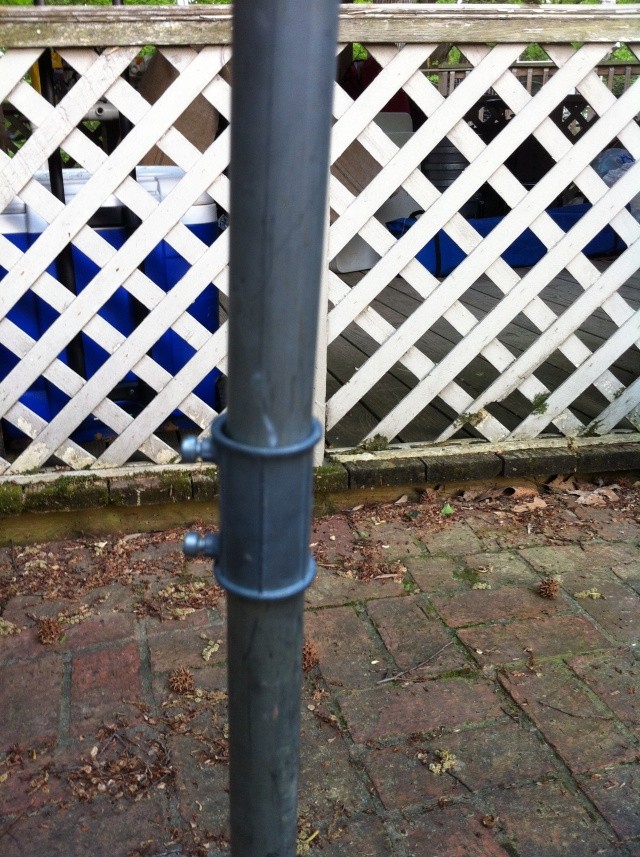
I used it this past weekend with my new EZ up tent. Hubby has a new frame in the works that will not interfere with the tent canvas at all. I'll post pics of that one when we have it finished,

rthling- Number of posts : 1830
Age : 52
Location : Millington, TN
Registration date : 2010-10-05 -
Re: Your setup
![]() by acarreon Tue Apr 30, 2013 1:31 pm
by acarreon Tue Apr 30, 2013 1:31 pm

acarreon- Number of posts : 453
Age : 39
Location : Dallas, TX
Registration date : 2012-04-14 -
rthling- Number of posts : 1830
Age : 52
Location : Millington, TN
Registration date : 2010-10-05 -
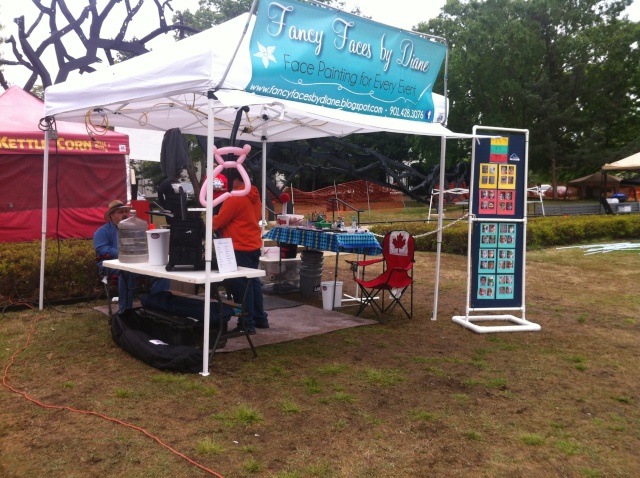
Pink Carnival!
![]() by scfacepainter Mon Oct 21, 2013 2:19 pm
by scfacepainter Mon Oct 21, 2013 2:19 pm
Julzz
Emerald's Artistry Facepainting
Lexington/Columbia SC
Last edited by scfacepainter on Mon Oct 21, 2013 2:21 pm; edited 1 time in total (Reason for editing : pics didnt show...)
scfacepainter- Number of posts : 3
Registration date : 2013-10-21
Re: Your setup
![]() by scfacepainter Mon Oct 21, 2013 2:23 pm
by scfacepainter Mon Oct 21, 2013 2:23 pm
scfacepainter- Number of posts : 3
Registration date : 2013-10-21
Re: Your setup
![]() by Kris5115 Mon Oct 21, 2013 3:30 pm
by Kris5115 Mon Oct 21, 2013 3:30 pm
http://www.facepaintforum.com/t2773-how-do-i-post-photos

Kris5115- Number of posts : 754
Location : Twin Cities, MN
Registration date : 2012-04-10
Re: Your setup
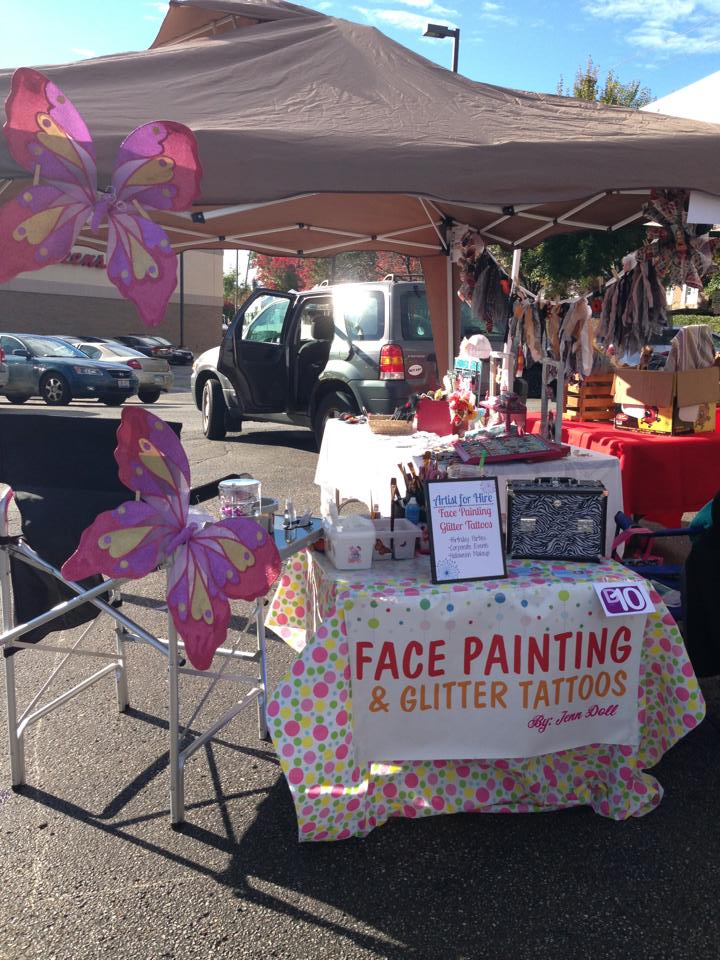
![]() by Jenn Doll Mon Oct 21, 2013 6:37 pm
by Jenn Doll Mon Oct 21, 2013 6:37 pm
https://www.facebook.com/photo.php?fbid=10151661637162843&set=pb.44710747842.-2207520000.1382394648.&type=3&theater
https://scontent-a-ord.xx.fbcdn.net/hphotos-prn2/1380500_10202241347979421_1386339330_n.jpg
The second one was a corner of my 10x10, from the outside looking in.. I should have taken one looking down on my kit... next time! :)They are both super easy and I can carry everything in one trip... if the table is provided, otherwise two with a table... ;)I'm not sure if you can see in the first photo, the black brush holder? It spins... I love it! Best part, I paid $1 at a garage sale!

Jenn Doll- Number of posts : 90
Age : 42
Location : Canton, OH
Registration date : 2012-03-12 -
Re: Your setup
![]() by Jenn Doll Mon Oct 21, 2013 7:21 pm
by Jenn Doll Mon Oct 21, 2013 7:21 pm
Figured it out...
Jenn Doll- Number of posts : 90
Age : 42
Location : Canton, OH
Registration date : 2012-03-12 -
Re: Your setup
![]() by fesspenter Mon Oct 21, 2013 10:17 pm
by fesspenter Mon Oct 21, 2013 10:17 pm
Welcome to the Forum!
I can see you are new.
Please, feel free to introduce yourself in the introduction section. There is a thread for newbies to post and share their art to a kind, warm, non-judgemental audience in Show and Tell. There is a game of Face Paint Tag going on in TAG! You're it! I think there is a thread on how to post pictures.
I am glad you are here!

fesspenter- Number of posts : 3352
Age : 64
Location : Toronto, Ontario, Canada
Registration date : 2011-04-29 -
barbb919- Number of posts : 2109
Location : Lacrosse Wisconsin
Registration date : 2010-03-23 -
Page 5 of 5 • 1, 2, 3, 4, 5
» So I setup a website...
» I need some Ideas for setup
» Your setup photos... can i use them?
» Loading up your fatmax
|
|
|