

Post Away!
+56
chercolette
vinnie
Shelley_shell
Jobena1
lala
Krissiemarie
loveallyourart
daisy stitch
Valerie A
Facepainting by Tina
anniel
Caswell Designs FP
Psalmbook
hotnails78
Rae
Perry Noia
FourWildFlowers
daphne78
AvidLebon
Lindasfacepainting
Kayla Sanders
FlashM
CATZ
facetheart
Doe
emkensuri
GracieFace
mamakatrien
crysface
Boe
maricarmenv
Kammy
barbb919
creativepainter
Party Picassos
jennvangogh
Face Painting By Donna
tatsuya1
klurii
rockxval
vegas mom
Smiletime
Maris-design
facesbybelle
amylady222
michellesfantasyfaces
l!zzie
ankasha2601
eva
martha
Jody Rife
Face Painting by Jessica
Pilareta
Criss
pjhamel
Metina
60 posters
Page 6 of 6
Page 6 of 6 •  1, 2, 3, 4, 5, 6
Festive Halloween Silhouette
![]() by AvidLebon Fri Oct 12, 2012 4:40 pm
by AvidLebon Fri Oct 12, 2012 4:40 pm
This is my last submission. I've seen silhouettes done before, so this is my first try at one.  Step by step in the link.

https://imgur.com/a/so7LH
https://imgur.com/a/so7LH

AvidLebon- Number of posts : 38
Age : 40
Location : Chicago
Registration date : 2012-09-16 -

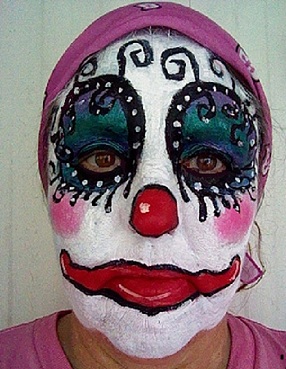
clown
![]() by creativepainter Sat Oct 13, 2012 6:13 pm
by creativepainter Sat Oct 13, 2012 6:13 pm
supplies:
sponge
#3 round
dfx white
tag pearl rainbow
snaz red
snaz pink
step 1-with sponge cover white area
step 2-add colors for eyes,cheeks, mouth,nose
step3- add black outline and finish with white dot details
[quote]
sponge
#3 round
dfx white
tag pearl rainbow
snaz red
snaz pink
step 1-with sponge cover white area
step 2-add colors for eyes,cheeks, mouth,nose
step3- add black outline and finish with white dot details
[quote]
Last edited by creativepainter on Mon Oct 15, 2012 6:59 pm; edited 2 times in total

creativepainter- Number of posts : 23
Registration date : 2012-04-25
Re: Post Away!
![]() by vinnie Sun Oct 14, 2012 12:11 am
by vinnie Sun Oct 14, 2012 12:11 am
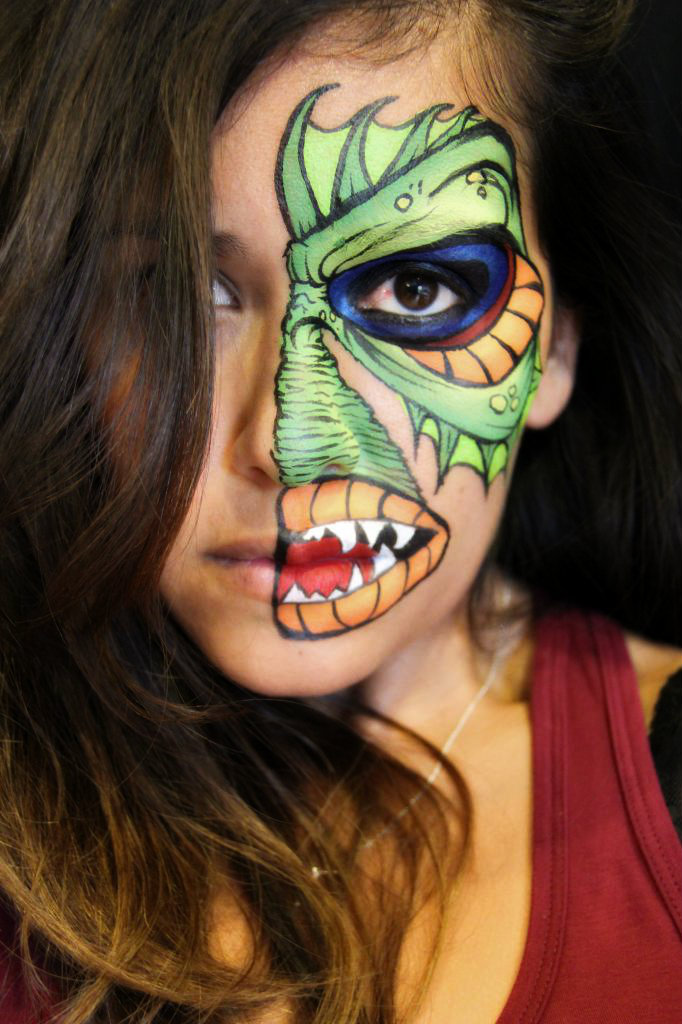
Here's my Creature of the Black Lagoon!
Tools
3/4 flat brush
1/2 flat brush
6 round brush
4 round brush
2 round brush
Snazaroo red
DFX white, black, and metallic blue
TAG light green
homemade cakes (using yellow and orange section) (using yellow and green section)
Step 1 - Paint shape of eye using metallic blue and DFX black with 6 round brush
Step 2 - Paint a strip of red to bottom of the eye with 4 round brush
Step 3 - Paint cheek bone shape using yellow and orange split with 1/2 flat bush
Step 4 - Paint shape of face using yellow and green split with 3/4 flat blush and lips using yellow and orange split with 1/2 flat brush
Step 5 - Paint webbed fins using Snaz green with 2 round brush and TAG light green with 2 round brush
Step 6 - Paint teeth using DFX white with 2 round brush
Step 7 - Paint tongue using Snaz red with 2 round, following shape of your lips
Step 8 - Outline like CRAZY using DFX black with 2 round


vinnie- Number of posts : 315
Location : Orange County
Registration date : 2010-08-27 -
Re: Post Away!
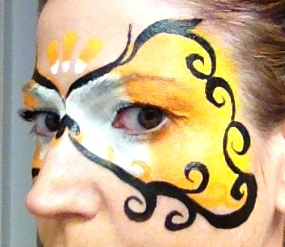
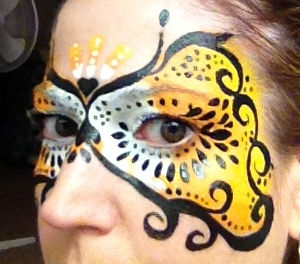
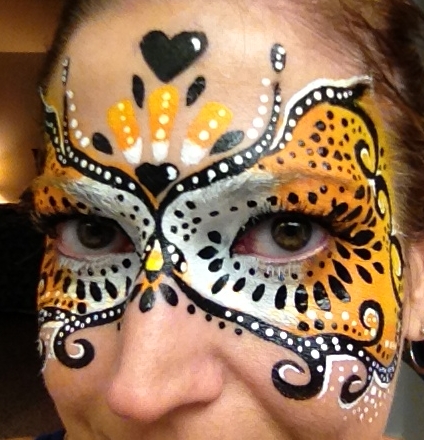
![]() by chercolette Sun Oct 14, 2012 3:29 am
by chercolette Sun Oct 14, 2012 3:29 am
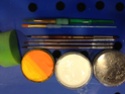
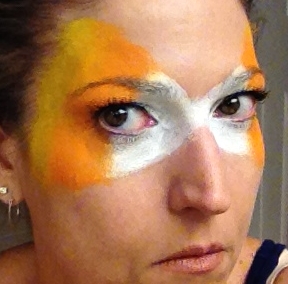
This is my first post to a contest. I am very much a beginner, but had to post my homage to Candy Corn 
Tools:
Wolfe Black
Wolfe White
Paradise Orange and Paradise Yellow (in a split I made to save space)
Lowell Cornell American Painter Round #0, #2, #4
Princeton Round #4
Royal Craft Smart Round #10 , Filbert #6
Sponge (Wolfe?)
Sponge Wolfe white over eyes
Sponge Paradise orange and yellow
Add a few candy corn accents. I used the filbert in my orange and yellow split and added a white point.
Add black swirls, tear drops, hearts and dots. I used the Princeton round #4 (first try with it) and the LC round #4.
Add white accents and dots using the LC round #2 and round #0 for fine lines.
 painting\IMG_1746.JPG
Tools:
Wolfe Black
Wolfe White
Paradise Orange and Paradise Yellow (in a split I made to save space)
Lowell Cornell American Painter Round #0, #2, #4
Princeton Round #4
Royal Craft Smart Round #10 , Filbert #6
Sponge (Wolfe?)
Sponge Wolfe white over eyes
Sponge Paradise orange and yellow
Add a few candy corn accents. I used the filbert in my orange and yellow split and added a white point.
Add black swirls, tear drops, hearts and dots. I used the Princeton round #4 (first try with it) and the LC round #4.
Add white accents and dots using the LC round #2 and round #0 for fine lines.
painting\IMG_1746.JPG
chercolette- Number of posts : 4
Location : Anaheim, CA
Registration date : 2011-09-12

michellesfantasyfaces- Number of posts : 3190
Age : 51
Location : Landgraaf, Netherlands
Registration date : 2010-02-18 -
vinnie- Number of posts : 315
Location : Orange County
Registration date : 2010-08-27 -
scary alien
![]() by creativepainter Sun Oct 14, 2012 8:33 pm
by creativepainter Sun Oct 14, 2012 8:33 pm
ok guys here is my last entry...it's been so fun!!!
supplies
Tag-Spritzer cake
tag neon-yellow
dfx black
#0 round
#4 round
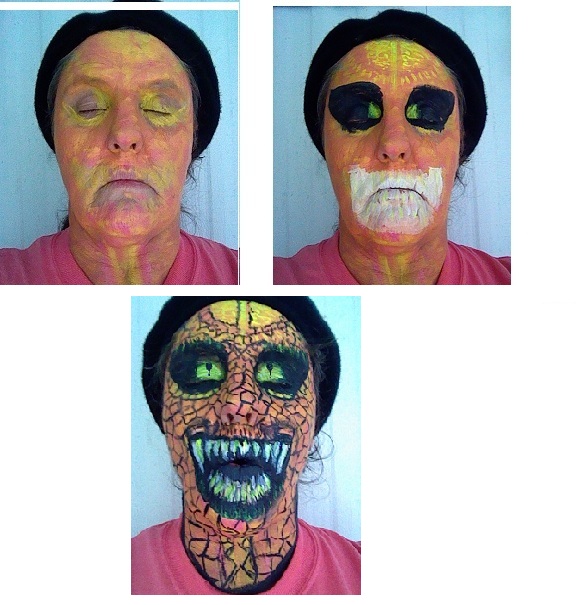
step 1 Block in colors yellows, orange
step 2 add white and black for teeth and eyes
step 3 draw in scales,and outline teeth,
step 4 add details in scales and eyes
supplies
Tag-Spritzer cake
tag neon-yellow
dfx black
#0 round
#4 round
step 1 Block in colors yellows, orange
step 2 add white and black for teeth and eyes
step 3 draw in scales,and outline teeth,
step 4 add details in scales and eyes
creativepainter- Number of posts : 23
Registration date : 2012-04-25
Re: Post Away!
![]() by Acesneverwin Mon Oct 15, 2012 3:28 pm
by Acesneverwin Mon Oct 15, 2012 3:28 pm
I actually did two looks but the other didn't come out like I wanted but I was proud of the contours and highlights I did with it. So I tried coming up with a different design and I was much more happy with it I think I'm getting better so that's a plus.
I thought it would be cool to try and do a vampire that didn't quite get out of the daylight in time and started turning to stone on the side of the face hit by the light. Anyway:
Stuff used: Wolfe White, Black, and Grey. Cheap black eye liner and black eye shadow for around the eyes... A sponge and number 1 or 2 round brush...

Started out drawing the idea out on my face with an eye liner then filled in the parts I wanted white with a sponge.

Sponged on Wolfe gray where I wanted the stone look... again applied with a sponge.
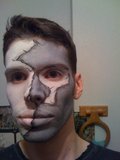
Using wolfe black and a small round paintbrush, I drew out the black lines along the areas where the gray and white meet. By the time I finished outlining everything, the brush was dry enough where I could go back over the line on the gray side and add shadow to give it some depth like the white peeling off. Just kept going over and over because I didn't want my brush to get wet till I finished. If your paint gets to dry... BARELY dip it in water and rub it in the makeup a bit till it's thick on the brush... then it will still go on light enough to keep the shadow shaded look.
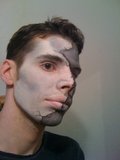

After that I started working on the contours and highlights. For the white side, I used wolf gray on a sponge and got it thick on the sponge. Then I applied the sponge as lightly as I could and just kept going over and over till it was as dark as I wanted it. It came out really good IMO for me anyway I did this on the forehead, the temples, and then under the cheekbone and a little under my lip. I also lightly did around the nose and slightly down the crease when you smile. I did the same thing on the gray side only with wolfe black. On the black side, I also loaded a sponge with white and very lightly highlighted on the gray side to give it more of a stone look and make it pop a bit. Did this on the lips, cheek bone, nose and forehead. I basically just turned my head into the light and saw where it hit the brightest and just dabbed white in those areas. If I messed up or got it TOO bright, I would take the dry side of the sponge and sponge it down softer.
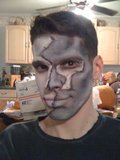
Finished up with black eyeliner under the eyes and black eyeshadow on top (and by the way this is the first time I've ever used eyeshadow or eyeliner on myself but I don't think it came out too bad but it took a lot longer than it looks cause I'd mess it up and had to keep fixing it but I was pretty happy at the end).
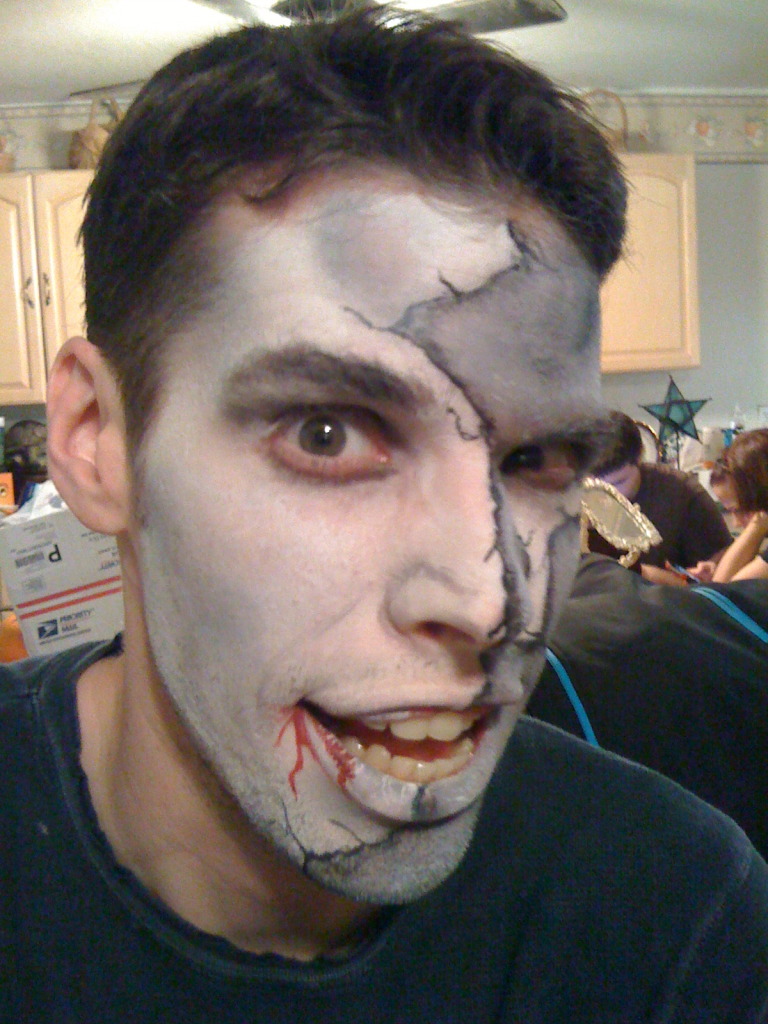
And that's it.. Oh I forgot... at the end I mixed read with a bit of black and painted some blood on the side of my mouth and a little gray on the white side of the lips. And I had some awesome vampire teeth... those petite vampire caps from like Scarecrow or Ghost House... but couldn't find em for the picture but... oh well.
I thought it would be cool to try and do a vampire that didn't quite get out of the daylight in time and started turning to stone on the side of the face hit by the light. Anyway:
Stuff used: Wolfe White, Black, and Grey. Cheap black eye liner and black eye shadow for around the eyes... A sponge and number 1 or 2 round brush...
Started out drawing the idea out on my face with an eye liner then filled in the parts I wanted white with a sponge.
Sponged on Wolfe gray where I wanted the stone look... again applied with a sponge.
Using wolfe black and a small round paintbrush, I drew out the black lines along the areas where the gray and white meet. By the time I finished outlining everything, the brush was dry enough where I could go back over the line on the gray side and add shadow to give it some depth like the white peeling off. Just kept going over and over because I didn't want my brush to get wet till I finished. If your paint gets to dry... BARELY dip it in water and rub it in the makeup a bit till it's thick on the brush... then it will still go on light enough to keep the shadow shaded look.
After that I started working on the contours and highlights. For the white side, I used wolf gray on a sponge and got it thick on the sponge. Then I applied the sponge as lightly as I could and just kept going over and over till it was as dark as I wanted it. It came out really good IMO for me anyway
Finished up with black eyeliner under the eyes and black eyeshadow on top (and by the way this is the first time I've ever used eyeshadow or eyeliner on myself but I don't think it came out too bad but it took a lot longer than it looks cause I'd mess it up and had to keep fixing it but I was pretty happy at the end).
And that's it.. Oh I forgot... at the end I mixed read with a bit of black and painted some blood on the side of my mouth and a little gray on the white side of the lips. And I had some awesome vampire teeth... those petite vampire caps from like Scarecrow or Ghost House... but couldn't find em for the picture but... oh well.
Acesneverwin- Number of posts : 9
Registration date : 2012-10-04
Re: Post Away!
![]() by vinnie Mon Oct 15, 2012 3:37 pm
by vinnie Mon Oct 15, 2012 3:37 pm
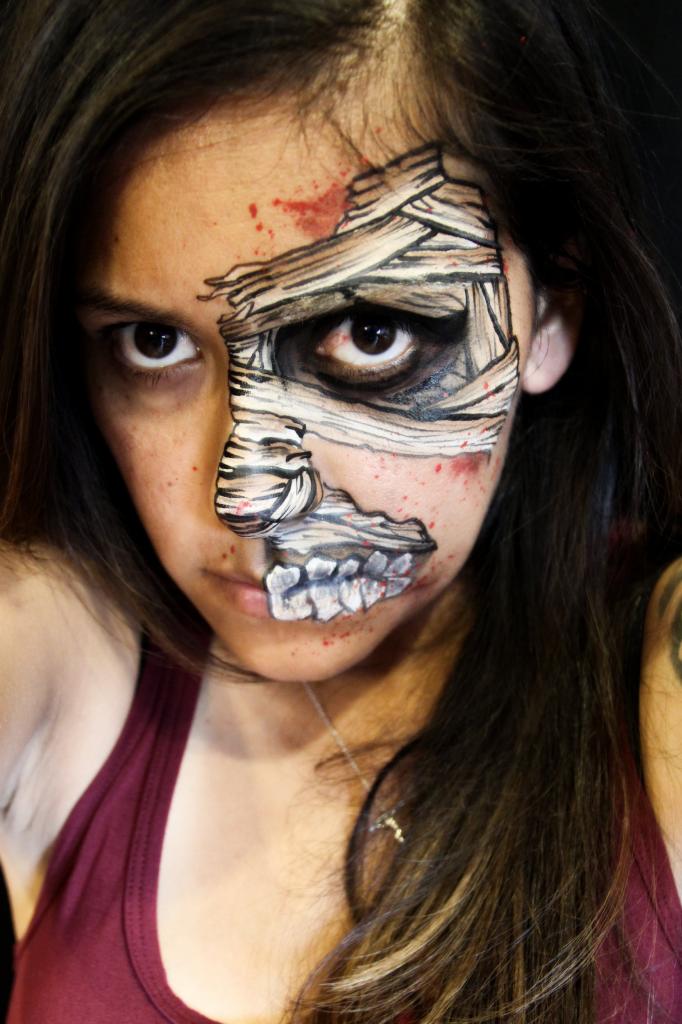
Here's another one! Mummy!
Tools
Snaz red and brown
DFX black and white
Homemade splite (white and brown part only)
Sponge
4 round brush
2 round brush
wipe (not neccesary)
Step 1 - Sponge a little of brown and black around the eye. Tip: use wipe to smear.
Step 2 - Paint teeth using white with 4 round brush. Add a hint of brown to teeth.
Step 3 - Paint bandages using white and brown split with 1/2 flat brush.
Step 4 - Outline outer shape of design and teeth using black with 2 round brush.
Step 5 - Outline all the bandages using black with 2 round brush
Step 6 - Fill bandages with detail using black with 2 round brush. Add "bags" under eye.
Step 7 - Sponge a little black around eye and add black to teeth with 2 round brush.
Step 8 - Splatter blood using watered Snaz red with 4 round brush.

vinnie- Number of posts : 315
Location : Orange County
Registration date : 2010-08-27 -
Re: Post Away!
![]() by Face Painting by Jessica Mon Oct 15, 2012 4:01 pm
by Face Painting by Jessica Mon Oct 15, 2012 4:01 pm
Love the mummy!!!!!!!!!!!!!!!!!! Lol, I actually dragged my bf to the screen yesterday to ask him angrily why mine don't look like that.
Face Painting by Jessica- Number of posts : 644
Age : 32
Location : Georgetown, Ontario
Registration date : 2012-04-12 -
Re: Post Away!
![]() by vegas mom Mon Oct 15, 2012 7:31 pm
by vegas mom Mon Oct 15, 2012 7:31 pm
Cher and others how creative and great posts.... Cher I love candy corn and am so happy that my grocer has finally gotten the original ones in from Brach... Oh and your mask is awesome!!!

vegas mom- Number of posts : 778
Location : Henderson, NV
Registration date : 2011-11-06 -
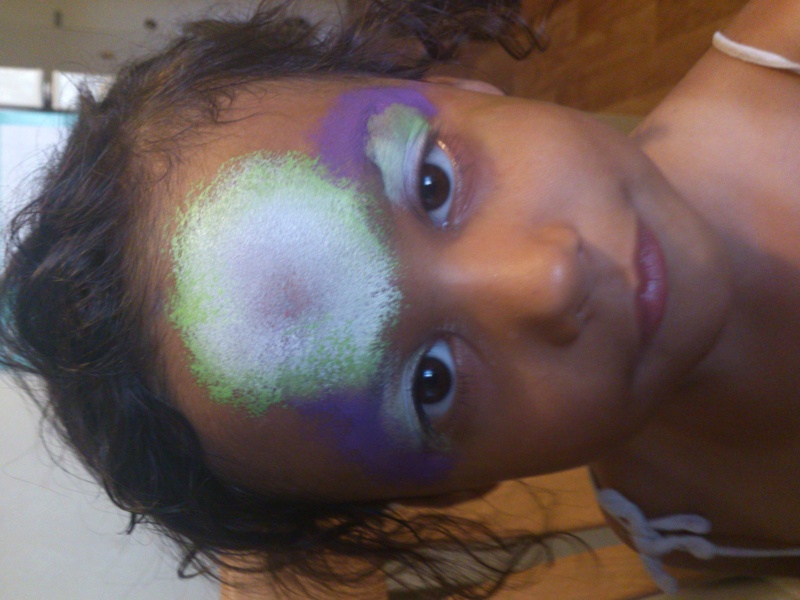
First Entry
![]() by MelindaT0813 Mon Oct 15, 2012 10:32 pm
by MelindaT0813 Mon Oct 15, 2012 10:32 pm
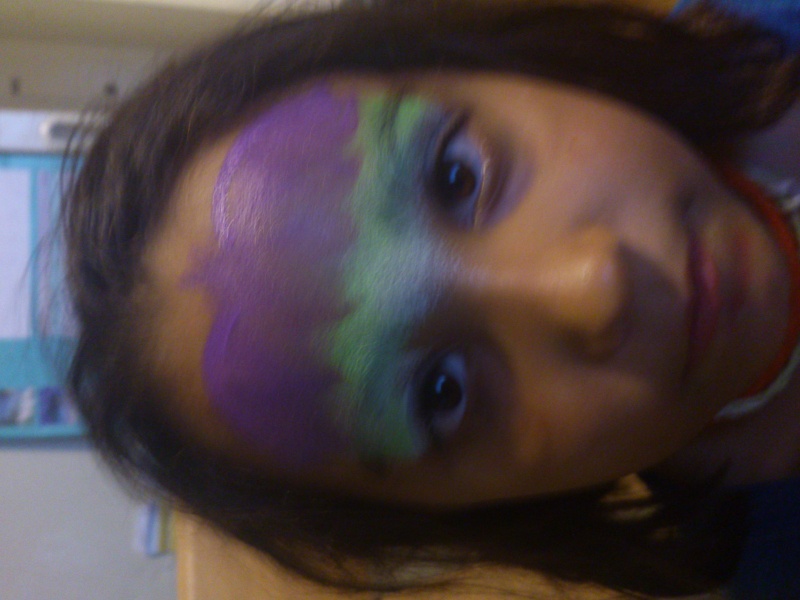
Tools used:
Homemade split cake (TAG: Purple, Green, White)
wolfe white
wolfe black
sponge and a #2 brush
How to:
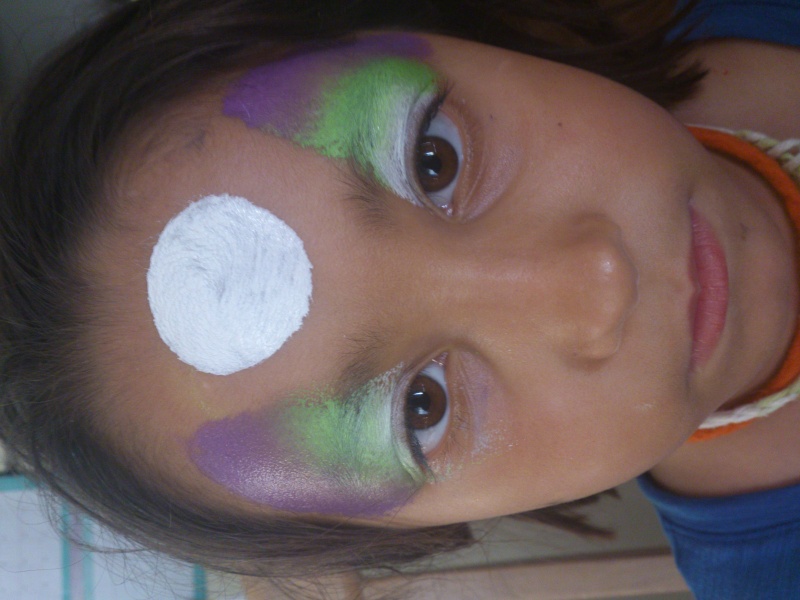
Sponge on the background
Draw in the extra hair in the same purple
Draw in bolts and eyebrows
Outline and Highlight

MelindaT0813- Number of posts : 568
Age : 38
Location : Miami, Florida
Registration date : 2011-03-16 -
Re: Post Away!
![]() by MelindaT0813 Mon Oct 15, 2012 10:35 pm
by MelindaT0813 Mon Oct 15, 2012 10:35 pm
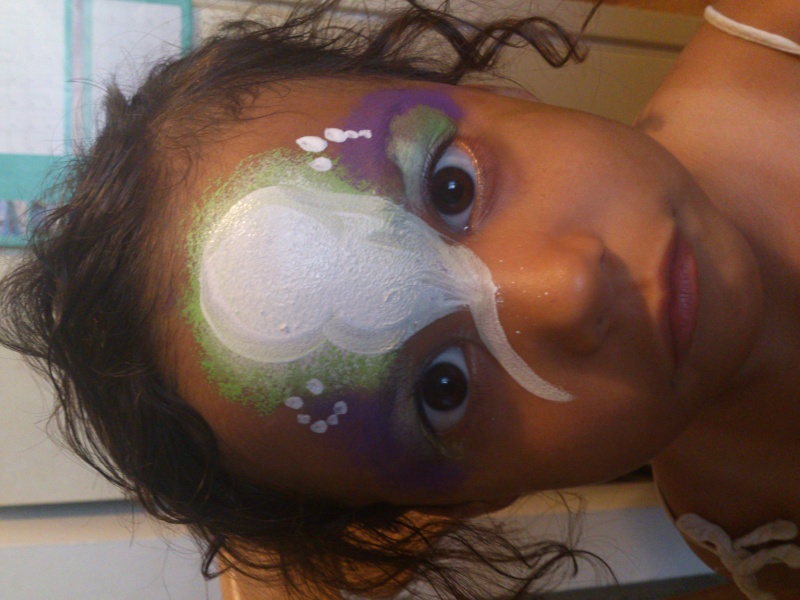
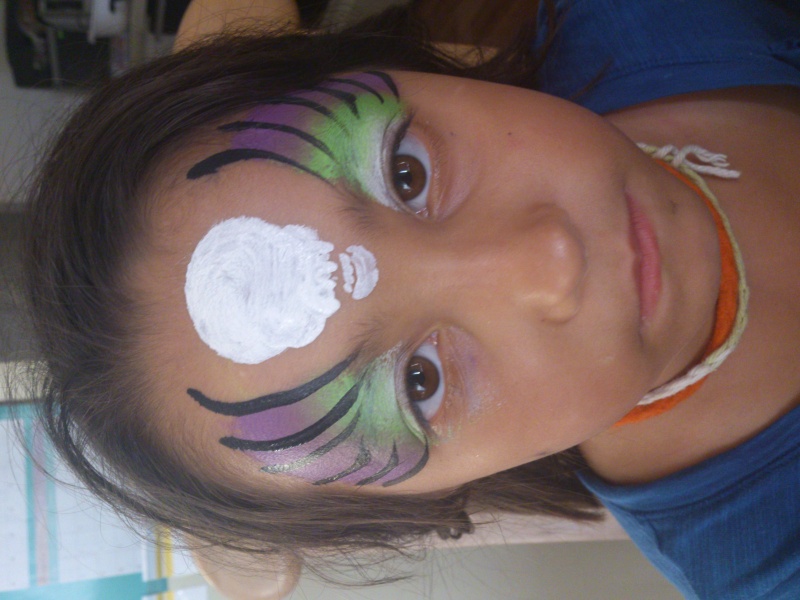
Tools used:
Homemade split cake (TAG: Purple, Green, White)
wolfe white
wolfe black
sponge, Pouncer and a #2 brush
Sponge in background
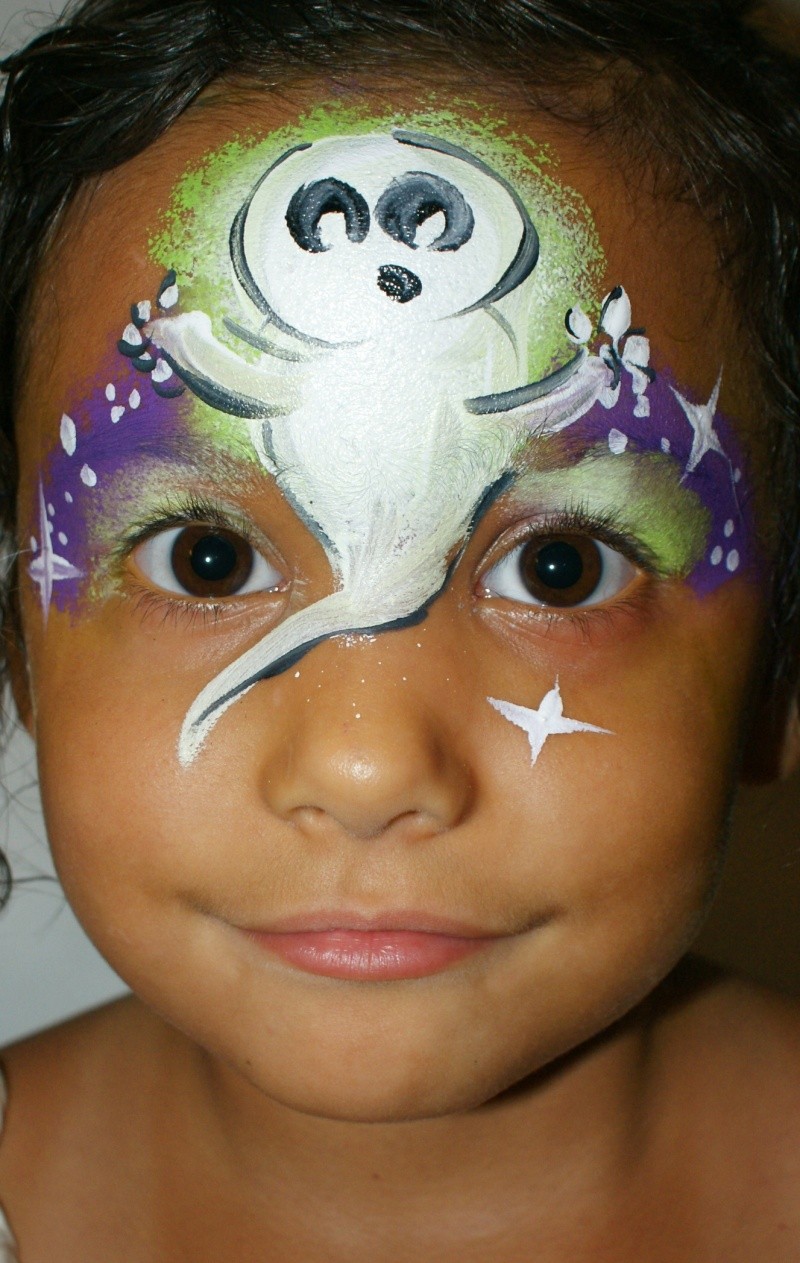
Pounce ghost outline
Finish creating body with the white
outline, dot and sparkle
MelindaT0813- Number of posts : 568
Age : 38
Location : Miami, Florida
Registration date : 2011-03-16 -
Re: Post Away!
![]() by MelindaT0813 Mon Oct 15, 2012 10:39 pm
by MelindaT0813 Mon Oct 15, 2012 10:39 pm
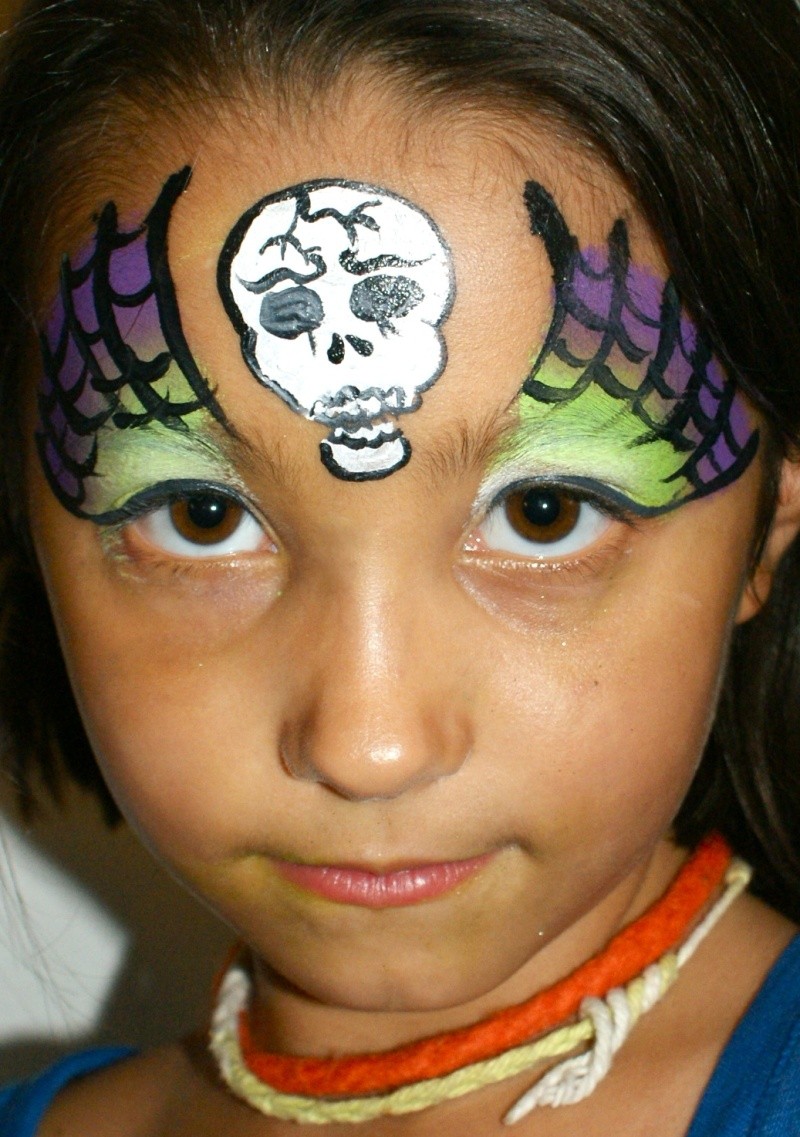
Tools used:
Homemade split cake (TAG: Purple, Green, White)
wolfe white
wolfe black
sponge, Pouncer and a #2 brush
How to:
Sponge in background
Pounce skull then finish with white brush
With black, draw in the webbing
outline and done
MelindaT0813- Number of posts : 568
Age : 38
Location : Miami, Florida
Registration date : 2011-03-16 -
vinnie- Number of posts : 315
Location : Orange County
Registration date : 2010-08-27 -
chercolette- Number of posts : 4
Location : Anaheim, CA
Registration date : 2011-09-12
Re: Post Away!
![]() by vinnie Tue Oct 16, 2012 1:47 am
by vinnie Tue Oct 16, 2012 1:47 am
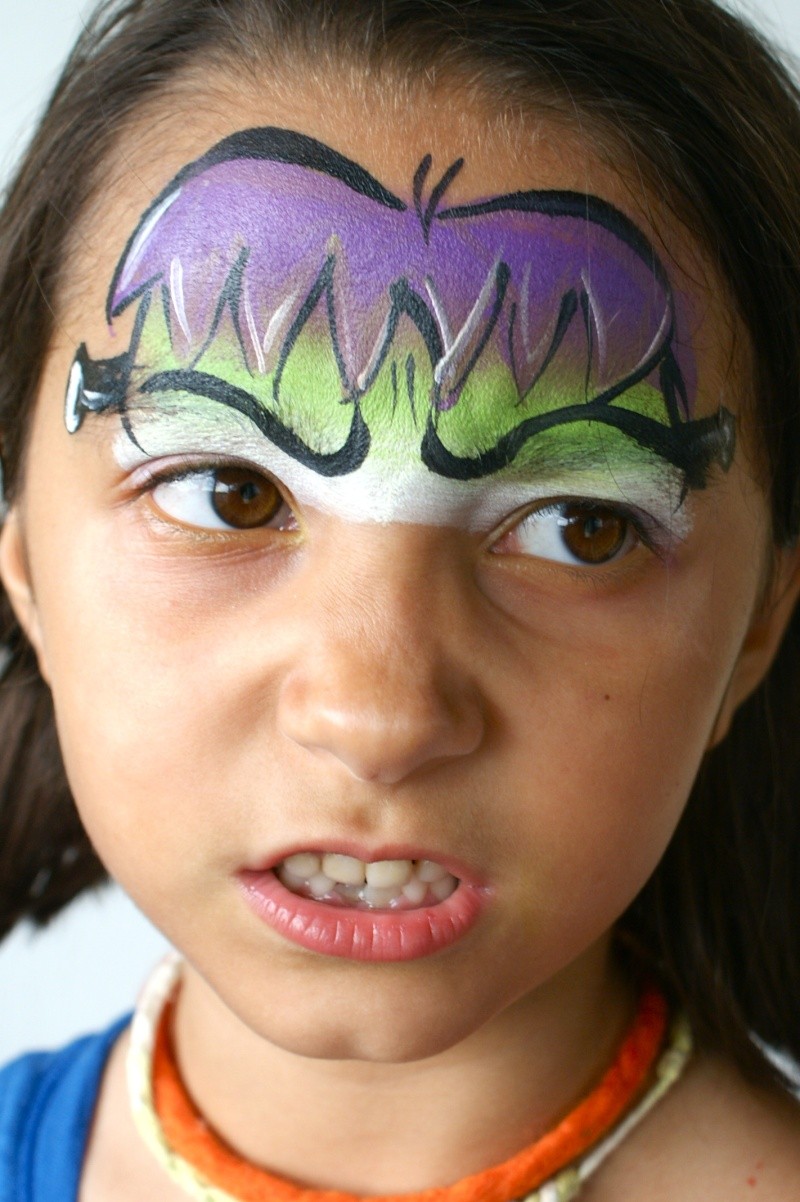
Last one! Frankenstein!!
Tools
DFX black, white, metallic green, and metallic silver
TAG berry wine
Homemade split cake (green and yellow only)
Mehron metallic powder
Sponge
1/2 flat brush
4 round brush
2 round brush
Step 1 - Sponge top of eye to eyebrow with black.
Step 2 - Paint shape of face with yellow/green split with 1/2 flat brush.
Step 3 - Paint Frankie's hair using black with 4 round brush.
Step 4 - Paint thin lips using metallic green with 2 round. Outline face using 2 round brush.
Step 5 - Add berry wine with 2 round brush under eye for "bags", and paint bolt using 2 round brush.
Step 6 - Outline the rest and add detail using black with 2 round brush.

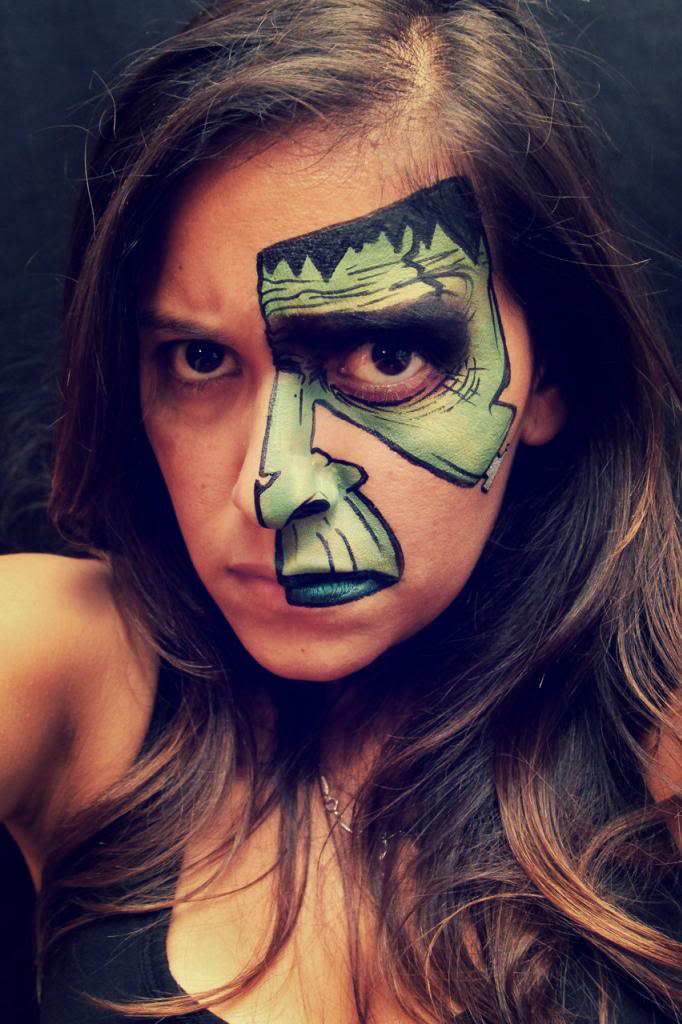
HAPPY HALLOWEEN!!!
Tools
DFX black, white, metallic green, and metallic silver
TAG berry wine
Homemade split cake (green and yellow only)
Mehron metallic powder
Sponge
1/2 flat brush
4 round brush
2 round brush
Step 1 - Sponge top of eye to eyebrow with black.
Step 2 - Paint shape of face with yellow/green split with 1/2 flat brush.
Step 3 - Paint Frankie's hair using black with 4 round brush.
Step 4 - Paint thin lips using metallic green with 2 round. Outline face using 2 round brush.
Step 5 - Add berry wine with 2 round brush under eye for "bags", and paint bolt using 2 round brush.
Step 6 - Outline the rest and add detail using black with 2 round brush.

HAPPY HALLOWEEN!!!
vinnie- Number of posts : 315
Location : Orange County
Registration date : 2010-08-27 -
Re: Post Away!
![]() by Jody Rife Tue Oct 16, 2012 7:21 am
by Jody Rife Tue Oct 16, 2012 7:21 am
Oh my goodness Melinda, I wish you had posted that Frankenstein forehead a few days ago! Had a kid ask for Frankenstein at a big busy festival, and all he got was the "deer in the headlights" look from me!LOL He settled for a monster. Love your design.
Vinnie, I am lovin your ideas. My fav is that swamp type monster you entered on the other pg. I think I'll run with that a bit and make a mask. Thank you for the inspiration.
Vinnie, I am lovin your ideas. My fav is that swamp type monster you entered on the other pg. I think I'll run with that a bit and make a mask. Thank you for the inspiration.

Jody Rife- Number of posts : 1725
Age : 51
Location : Gallipolis,Ohio
Registration date : 2011-02-19 -
Re: Post Away!
![]() by CottonKandyClown Wed Oct 17, 2012 9:55 am
by CottonKandyClown Wed Oct 17, 2012 9:55 am
Don't you just love those requests! LOL I usually say, "If you have a picture, I can do it!" It usually makes them pick from the board 

CottonKandyClown- Number of posts : 1109
Location : Williamson, WV
Registration date : 2010-06-25


IamGinaW- Number of posts : 1626
Age : 51
Location : California's beautiful Central Coast
Registration date : 2010-09-15 -
Jody Rife- Number of posts : 1725
Age : 51
Location : Gallipolis,Ohio
Registration date : 2011-02-19 -
Page 6 of 6 • 1, 2, 3, 4, 5, 6
Page 6 of 6
Permissions in this forum:
You cannot reply to topics in this forum|
|
|