

Any tips for painting pregnant bellies?
+3
JBax
LoneWolf
CATZ
7 posters
Page 1 of 1

Any tips for painting pregnant bellies?
![]() by CATZ Wed Feb 17, 2010 1:14 pm
by CATZ Wed Feb 17, 2010 1:14 pm
I'm painting my first 'full' pregnant belly on Monday. I'm wondering if anyone has any tips on how to make the client most comfortable and still be comfortable to paint. Is it best to have them lying down or in a chair? I'm going to paint a watermelon that is 'cracked' and have the baby's face looking out. The baby's name is going to be 'Melanie' so it works out well 

CATZ- Number of posts : 887
Age : 58
Location : Mission, BC
Registration date : 2009-10-04 -

Re: Any tips for painting pregnant bellies?
![]() by LoneWolf Wed Feb 17, 2010 4:15 pm
by LoneWolf Wed Feb 17, 2010 4:15 pm
If yo start by sketching the design when she is in the position you want to take the picture, then you can have her sitting, lying or standing on her head when you paint the details.
Another tip is to design it so it looks best from the side, not front, since it shows the belly shape best from that direction =)
Another tip is to design it so it looks best from the side, not front, since it shows the belly shape best from that direction =)
LoneWolf- Number of posts : 1340
Age : 42
Location : Denmark
Registration date : 2008-10-04 -
Re: Any tips for painting pregnant bellies?
![]() by JBax Wed Feb 17, 2010 6:36 pm
by JBax Wed Feb 17, 2010 6:36 pm
It's not good for a pregnant woman that far along to lay flat on her back, esp for a long period of time... squishes a blood vessel in mom and decreases flow of blood to baby. When I did mine, I brought my director's chair, and they slouched back to make room for the belly, and I sat in a chair to do a lot of the painting.
It's really cool when baby moves under your brush.
It's really cool when baby moves under your brush.
Last edited by JBax on Wed Feb 17, 2010 9:59 pm; edited 1 time in total

JBax- Number of posts : 1890
Age : 48
Location : Indianapolis, IN
Registration date : 2009-08-30 -
Re: Any tips for painting pregnant bellies?
![]() by Criss Wed Feb 17, 2010 7:48 pm
by Criss Wed Feb 17, 2010 7:48 pm
I used a large office chair, that leans back, with a tall back and the base was wedged against something solid. Mom can lay on her left side, if lying down, as this will not decrease blood flow to the baby but other directions may. Make sure to support the lower back, neck and legs as fluids can pool causing discomfort, (swollen feet etc.) Make sure she's comfortable and keep checking in with her, to see that she is.

Criss- Number of posts : 906
Location : Lethbridge, Alberta
Registration date : 2009-06-07
Re: Any tips for painting pregnant bellies?
![]() by Gamezgirl Thu Feb 18, 2010 8:13 am
by Gamezgirl Thu Feb 18, 2010 8:13 am
I have always let the mom choose where SHE is most comfortable. I am aware of the laying on the back thing, but for my pregnancy, that was where I was most comfortable, I slept on my back every night, I was afraid of that so I talked the doctors and they told me it was ok. She will know if or when she needs to move, make sure to offer her breaks to move, walk, pee etc. As artists, we often get in the zone and don't notice time passing. I like having the mom's in a recliner so I can walk around them as needed to reach both sides. Also, if you paint a complex border, just remember that she will have an awkward time getting up and it may smudge as her belly rubs on legs, pants...whatever...make it something you can fix easilly, or before you start, have her get up from wherever you have her seated so you can watch where the belly will rub on anything as she is trying to stand up. And expect to get kicked once or twice LOL The very coolest part of belly painting is when I have my hand on mom's tummy and the baby rolls to the heat of my hand or kicks the area I am painting. What a very cool and intimate time to share with someone. I love it!!

Gamezgirl- Number of posts : 473
Registration date : 2009-05-06
Re: Any tips for painting pregnant bellies?
![]() by LoneWolf Thu Feb 18, 2010 8:20 am
by LoneWolf Thu Feb 18, 2010 8:20 am
What kind of paint do you use since it will smudge so easily? I only have problems when skin is staying close to skin for some time, not just for touching briefly (or the time I used chocolate bodypaint..)
LoneWolf- Number of posts : 1340
Age : 42
Location : Denmark
Registration date : 2008-10-04 -
Re: Any tips for painting pregnant bellies?
![]() by CATZ Tue Feb 23, 2010 1:15 am
by CATZ Tue Feb 23, 2010 1:15 am
I did it! It only took 2 hours, and I really appreciate all the advice. My model relaxed on a lounger and she only had to pee once. I didn't realize that the design would change slightly once she stood up from lying down. Gravity has an effect, but it was fine for the design I did. It was cute when I'd be sponging on Michelle's belly, and 'Melanie' (the baby) would push back. The mom was really happy. Can't wait to hear what the reactions were when she picked up her kids at school like that. I had a professional photographer come, but I'll have to wait for those photos. Here's my amateur ones ...
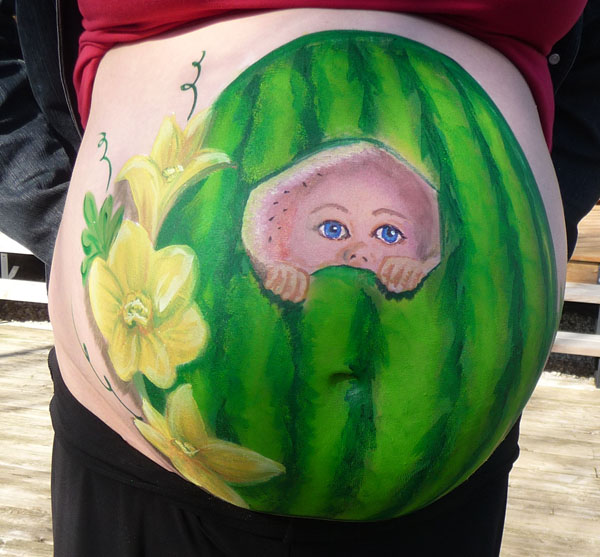

Here's a shot half way through the process. I can't believe how fast the time went by.

Here's a shot half way through the process. I can't believe how fast the time went by.
CATZ- Number of posts : 887
Age : 58
Location : Mission, BC
Registration date : 2009-10-04 -
Re: Any tips for painting pregnant bellies?
![]() by len sherrard Tue Feb 23, 2010 2:06 am
by len sherrard Tue Feb 23, 2010 2:06 am
very nice, the design just flows. great ideas and i love the way your flowers look 3-d. can you give us a bit of step by step? thanks for sharing

len sherrard- Number of posts : 910
Age : 74
Location : central washington state
Registration date : 2009-12-29 -
Re: Any tips for painting pregnant bellies?
![]() by CATZ Mon Mar 01, 2010 6:38 pm
by CATZ Mon Mar 01, 2010 6:38 pm
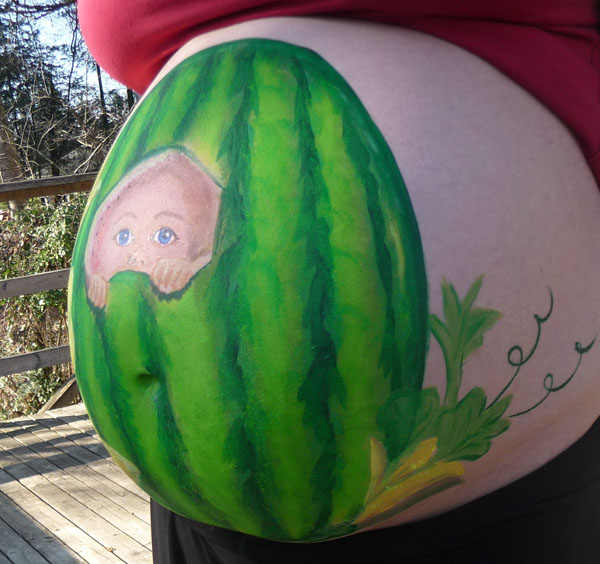
Here's a bit of a step by step. I only took the one 'midway' photo. I had a real watermelon on hand to refer to, plus some photos of watermelon flowers and a baby's face.
I started with an outline in white so I kept everything in perspective. I took Lone's advice and made sure the design looked good from the side for photographs. I started with the baby face as it had the most detail and I wasn't sure how long it'd take. I outlined the eyes and hands and then filled in with skin tones. I added white for the eyes and then worked on the pupils. Then I filled in the watermelon flesh. I used the inferenze mozart pink and snaz red. I think I should have gone bolder with that. I used white and light green for the cut part of the rind. At the end I added some black seeds.
I painted the watermelon before I finished the hands. I started with DFX light green stripes using a sponge. Then I used snaz grass green for stripes. It was a bit dull, so I tried the DFX metallic green, but it was too blue, so I smudged it in lightly on all the stripes and then used a flat 3/4" brush to 'zig zag' a dark green DFX layer over the dark stripes. Then I went over with the DFX light green again with a sponge. This softened the stripes and gave it a more organic feel. I outlined the watermelon in the dark green and 'dry brushed' it a bit to give it some dimension, but the mom's belly gave it plenty of dimension so I didn't have to work that too hard. Then I went back to the baby fingers and finished them and gave them a shadow underneath.
The easy part was the flowers. I just used some light brown for a shadow and outline then added yellow, and white, and brown, and green with a flat brush until I got the look I wanted. I added some irridescent yellow sparkle for fun. By the time I got to the leaves, we were all a bit 'done', so I did them pretty quick. Used snaz green and dark green. I used dark green for the curly q's. I forgot to give them and the leaves shadows...oops.
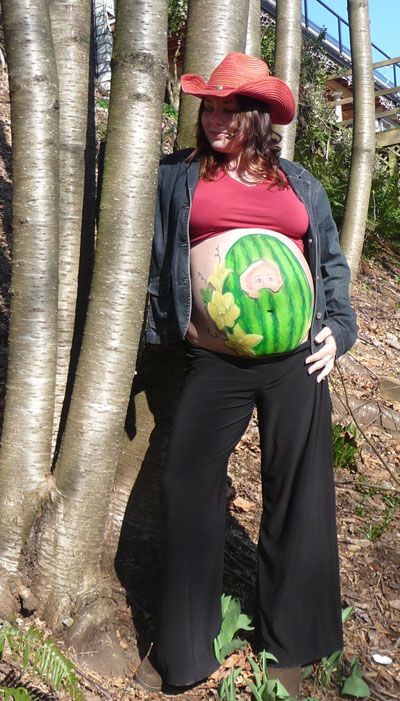
When she stood up I noticed a few touch ups needed to be done like her belly button and a few spots that 'shifted' with gravity.
I had a professional photographer take some photos and I'm looking forward to seeing those. My next prenatal belly will be a peacock!
I started with an outline in white so I kept everything in perspective. I took Lone's advice and made sure the design looked good from the side for photographs. I started with the baby face as it had the most detail and I wasn't sure how long it'd take. I outlined the eyes and hands and then filled in with skin tones. I added white for the eyes and then worked on the pupils. Then I filled in the watermelon flesh. I used the inferenze mozart pink and snaz red. I think I should have gone bolder with that. I used white and light green for the cut part of the rind. At the end I added some black seeds.
I painted the watermelon before I finished the hands. I started with DFX light green stripes using a sponge. Then I used snaz grass green for stripes. It was a bit dull, so I tried the DFX metallic green, but it was too blue, so I smudged it in lightly on all the stripes and then used a flat 3/4" brush to 'zig zag' a dark green DFX layer over the dark stripes. Then I went over with the DFX light green again with a sponge. This softened the stripes and gave it a more organic feel. I outlined the watermelon in the dark green and 'dry brushed' it a bit to give it some dimension, but the mom's belly gave it plenty of dimension so I didn't have to work that too hard. Then I went back to the baby fingers and finished them and gave them a shadow underneath.
The easy part was the flowers. I just used some light brown for a shadow and outline then added yellow, and white, and brown, and green with a flat brush until I got the look I wanted. I added some irridescent yellow sparkle for fun. By the time I got to the leaves, we were all a bit 'done', so I did them pretty quick. Used snaz green and dark green. I used dark green for the curly q's. I forgot to give them and the leaves shadows...oops.
When she stood up I noticed a few touch ups needed to be done like her belly button and a few spots that 'shifted' with gravity.
I had a professional photographer take some photos and I'm looking forward to seeing those. My next prenatal belly will be a peacock!
CATZ- Number of posts : 887
Age : 58
Location : Mission, BC
Registration date : 2009-10-04 -
Re: Any tips for painting pregnant bellies?
![]() by Magic Mon Mar 01, 2010 8:30 pm
by Magic Mon Mar 01, 2010 8:30 pm
Great job - doesn't it feel awesome to get the first one under your belt. You really captured the colors in the watermelon.

Magic- Number of posts : 556
Age : 57
Location : Westchester, NY
Registration date : 2008-10-01 -
Re: Any tips for painting pregnant bellies?
![]() by len sherrard Tue Mar 02, 2010 1:57 am
by len sherrard Tue Mar 02, 2010 1:57 am
sweetness, thanks!
len sherrard- Number of posts : 910
Age : 74
Location : central washington state
Registration date : 2009-12-29 -
» HELP - client building form pregnant bellies
» First Pregnant Belly Painting!
» had so much fun painting this pregnant mom
» Painting while pregnant
» Painting while Pregnant
» First Pregnant Belly Painting!
» had so much fun painting this pregnant mom
» Painting while pregnant
» Painting while Pregnant
Page 1 of 1
Permissions in this forum:
You cannot reply to topics in this forum|
|
|